


Close to 3 years ago I authored this post on using PowerShell for Certificate based Azure AD Authentication using ADAL (Active Directory Authentication Library). More recently I’ve published posts on using MSAL (MicroSoft Authentication Library) with PowerShell for Application and Delegated integration with the Microsoft Graph. MSAL is well on the way to replacing ADAL. so we need to update our ADAL based integration automations to use MSAL with PowerShell and Certificate Authentication.
NOTE: Microsoft recently updated their documentation. The FAQ here states that ADAL will not be receiving any new functionality as of 30 June 2020. It’s time to ditch ADAL and use MSAL.
In this post I update my post from 3 years ago to show how to use MSAL with PowerShell and Certificate Authentication to an Azure AD Registered Application to leverage Application based API permissions. The certificate replaces the client secret during authentication in a client credentials authentication flow.
The process is very similar to the ADAL method;
- generate a self signed certificate
- add the certificate to the Azure AD Registered Application
- leverage the MSAL.NET library (via the MSAL.PS PowerShell Module) to authenticate to Microsoft Graph
- use the Access Token for Microsoft Graph queries using PowerShell
You will need the MSAL.PS PowerShell Module installed. You can do that quickly from an Administrative PowerShell 5.1+ session using the following command:
Install-Module -name MSAL.PS -Force -AcceptLicense
This post also assumes you have an existing Azure AD Registered App that you will add a certificate to. If not register one in Azure AD Blade of the Azure Portal.
Generate a Self Signed Certificate
From an Administrative PowerShell session use the following script to generate a Self Signed 10 year certificate. Update the $certPassword, $certName, $certPath and $certFileName variables for your Certificate Name, the password that will be associated with the Certificate when we export it from the Certificate Store, and where and what the certificate file will be named. Don’t use an extension for the file name.
$certPassword = "P@SSW0rd1"
$certName = "pwsh.darrenjrobinson.com"
$certPath = "C:\Users\darrenjrobinson\Certificates\SelfSigned\"
$certFileName = "AADAppCert"

$Params = @{
   "DnsName" = @($certName)
   "Subject" = "CN=$($certName)"
   "CertStoreLocation" = "Cert:\LocalMachine\My"
   "NotAfter" = (Get-Date).AddYears(10)
   "KeyAlgorithm" = "RSA"
   "KeyLength" = "2048"
}

$myCert = $null
$myCert = New-SelfSignedCertificate @Params
$thumbPrint = $myCert.Thumbprint
The Certificate will be created in the Local Computer Certificate Store. Using the MMC Certificates snap-in connected to the Local Computer we can locate our new Self Signed Certificate under Certificates => Personal => Certificates.

Export the Certificate
Using PowerShell we will now export our self signed certificate from the local computer certificate store and password protect it.
# Password to be set on the exported Certificate
$pwd = ConvertTo-SecureString -String $certPassword -Force -AsPlainText

# Export the Certificate
Export-PfxCertificate -cert "cert:\LocalMachine\My\$($thumbPrint)" -FilePath "$($certPath)$($certFileName).pfx" -Password $pwd
Obtain the Raw Certificate Data
From the Exported Certificate will will extract the certificate data and output it to another file in a format for upload to an Azure AD Registered App (with the .cer extension).
$x509cert = New-Object System.Security.Cryptography.X509Certificates.X509Certificate("$($certPath)$($certFileName).pfx", (ConvertTo-SecureString -String $certPassword -Force -AsPlainText))
$keyValue = [System.Convert]::ToBase64String($x509cert.GetRawCertData())
$keyValue | out-file "$($certPath)$($certFileName).cer"
Inspect the Certificate
Using my x509Details PowerShell Module we can easily inspect the Raw Certificate details to verify we have the correct certificate.
Get-X509Details $keyValue

Upload the Certificate to the Azure Registered App
From the ‘Certificates and secrets‘ menu item of your Azure AD Registered App, select ‘Upload Certificate‘, locate the exported certification on your local computer and select Add.
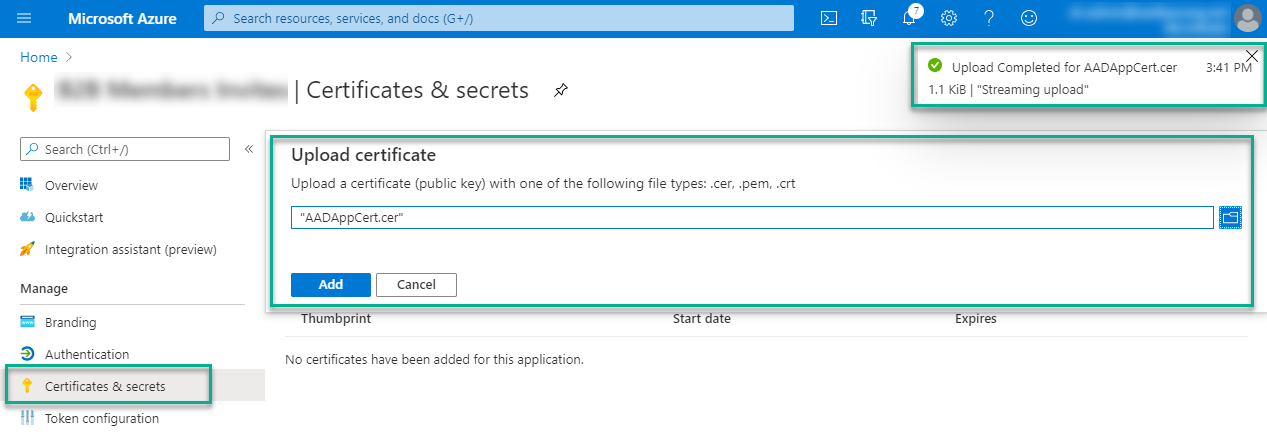
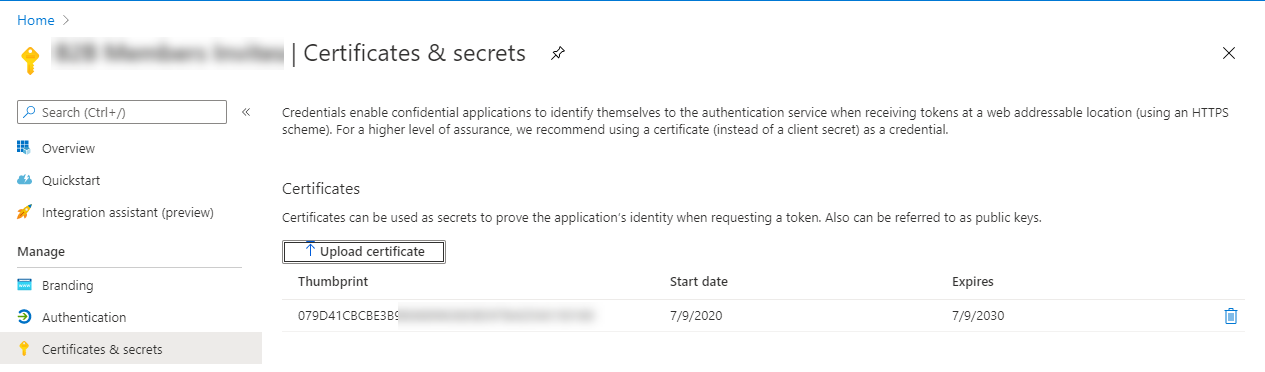
The Certificate will then be present on the registered Azure AD Application and valid for as an authentication secret.
Use MSAL.PS and Get-MsalToken with the Self Signed Certificate to get an Access Token
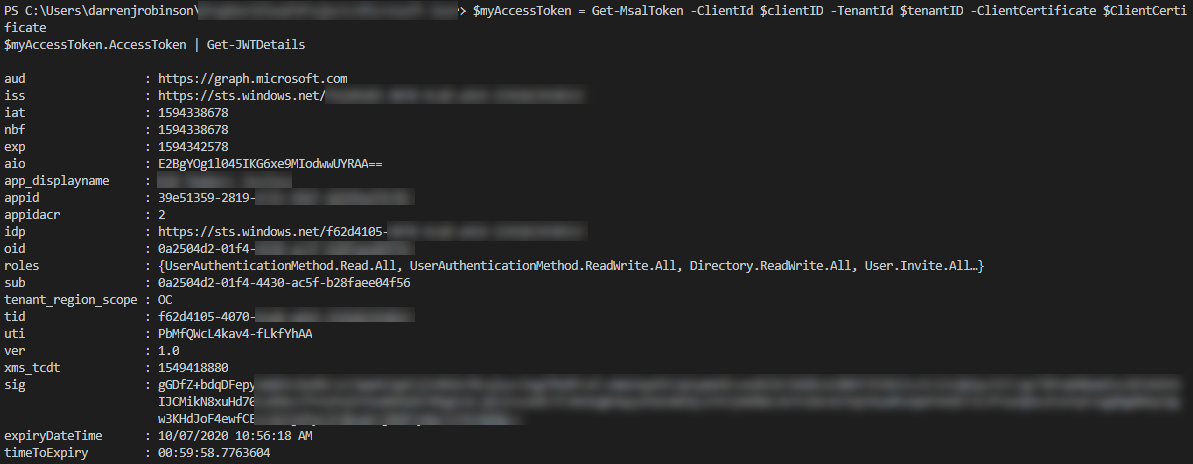
We can now use the MSAL.PS PowerShell Module with our certificate to authenticate to Microsoft Graph using our registered Azure AD Application.
Import-Module MSAL.PS
$clientID = 'yourAADRegisteredAppClientID'
$tenantID = 'yourAADTenantID'
$ClientCertificate = Get-Item "Cert:\LocalMachine\My\$($thumbPrint)"
$myAccessToken = Get-MsalToken -ClientId $clientID -TenantId $tenantID -ClientCertificate $ClientCertificate
# Inspect the Access Token using JWTDetails PowerShell Module
$myAccessToken.AccessToken | Get-JWTDetails
MSAL with PowerShell and Certificate Authentication – Using the Access Token
We can simply use our Access Token in the header of an Invoke-RestMethod request to the Microsoft Graph API as shown below to return a page of results for Azure AD Users and find those that contain ‘darren’ in the displayName attribute.
$users = (Invoke-RestMethod -Headers @{Authorization = "Bearer $($myAccessToken.AccessToken)" } `
  -Uri "https://graph.microsoft.com/beta/users" `
  -Method Get).value
$users | Select-Object | Where-Object {$_.displayName -like "*darren*"}

Refreshing the Access Token
To obtain a new Access Token we simply use Get-MsalToken with the same options as previously and if our existing token is close to expiring the refresh token will be used to obtain a new Access and Refresh Token.
$myAccessToken = Get-MsalToken -ClientId $clientID -TenantId $tenantID -ClientCertificate $ClientCertificate
To force a refresh of our Access and Refresh Tokens we simply add the -ForceRefresh switch to the Get-MsalToken cmdlet.
$myAccessToken = Get-MsalToken -ClientId $clientID -TenantId $tenantID -ClientCertificate $ClientCertificate -ForceRefresh
Summary
Using the MSAL.PS PowerShell Module we can quickly obtain an Azure AD Access Token with Application Permissions using a Self Signed Certificate and the Client Credentials flow, and then silently refresh our Access Token leveraging the MSAL.PS Module, the MSAL.NET library and the token cache.