


Just on a year ago I wrote this blog post that detailed a method to “Simultaneously Start|Stop all Azure Resource Manager Virtual Machines in a Resource Group”. It’s a simple script that I use quite a lot and I’ve received a lot of positive feedback on it.
One year on though and there are a few enhancements I’ve been wanting to make to it. Namely;
- host the script in an environment that is a known state. Often I’m authenticated to different Azure Subscriptions, my personal, my employers and my customers.
- prioritize the order the virtual machines startup|shutdown
- allow for a delay between starting each VM (to account for environments where the VM’s have roles that have cross dependencies; e.g A Domain Controller, an SQL Server, Application Servers). You want the DC to be up and running before the SQL Server, and so forth
- and if I do all those the most important;
- secure it so not just anyone can start|stop my environments at their whim
Overview
This blog post is the first that executes the first part of implementing the script in an environment that is a known state aka implementing it as an Azure Function App. This won’t be a perfect implementation as you will see, but will set the foundation for the other enhancements. Subsequent posts (as I make time to develop the enhancements) will add the new functionality. This post covers;
- Creating the Azure Function App
- Creating the foundation for automating management of Virtual Machines in Azure using Azure Function Apps
- Starting | Stopping all Virtual Machines in an Azure Resource Group
Create a New Azure Function App
First up we are going to need a Function App. Through your Azure Resource Manager Portal create a new Function App.

For mine I’ve created a new Resource Group and a new Storage Account as this solution will flesh out over time and I’d like to keep everything organised.
![]()
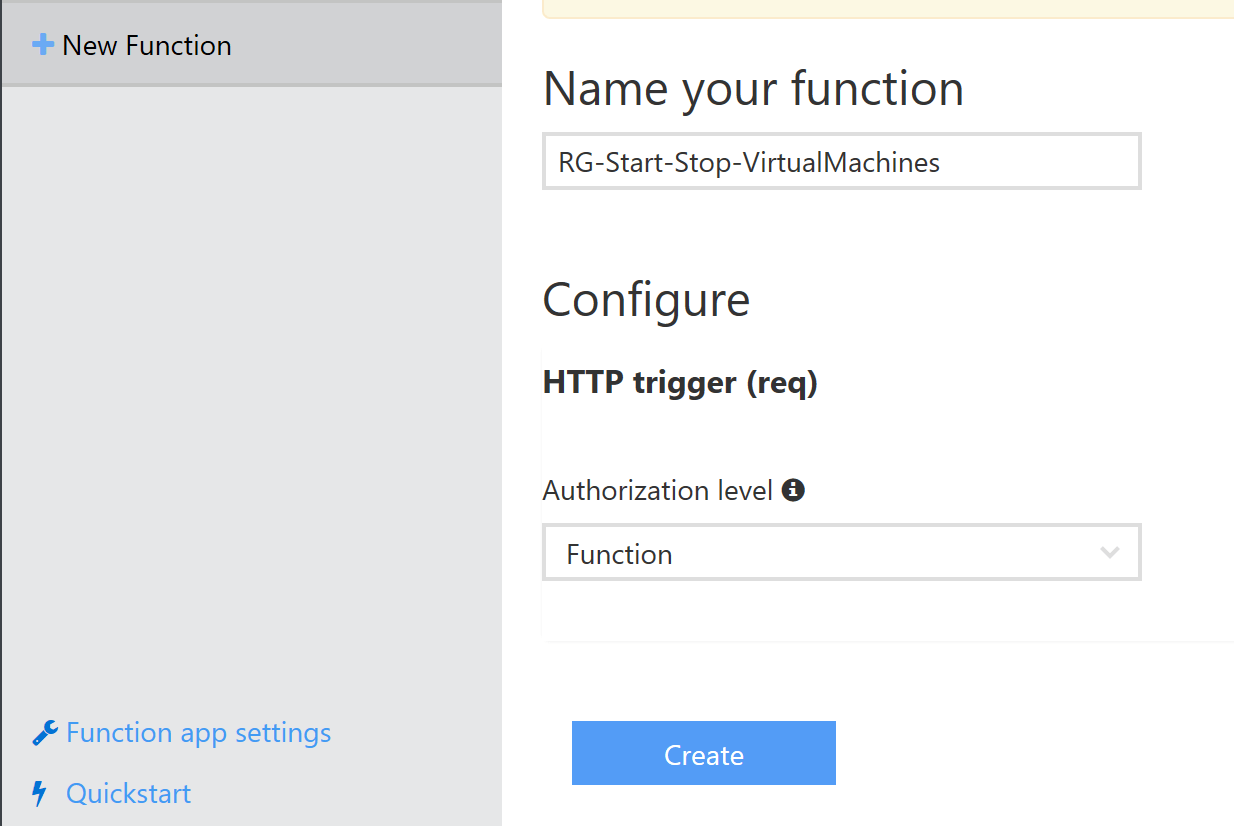
Now that we have the Azure App Plan setup, create a New PowerShell HTTP Trigger Function App.

Give it a name and hit Create.
Create Deployment Credentials
In order to get some of the dependencies into the Azure Function we need to create deployment credentials so we can upload them. Head to the Function App Settings and choose Go to App Service Settings.

Create a login and give it a password. Record the FTP/Deployment username and the FTP hostname along with your password as you’ll need this in the next step.

Upload our PowerShell Modules and Dependencies
Just as my original PowerShell script did I’m using the brilliant Invoke Parallel Powershell Script from Rambling Cookie Monster. Download it from that link and save it to your local machine.
Connect to your Azure Function App using your favourite FTP Client using the credentials you created earlier. I’m using WinSCP. Create a new sub-directory under /site/wwwroot/ named “bin” as shown below.

Upload the Invoke-Parallel.ps1 file from wherever you extracted it to on your local machine to the bin folder you just created in the Function App.

We are also going to need the AzureRM Powershell Modules. Download those via Powershell to your local machine (eg. Save-Module -Name AzureRM -Path c:\temp\azurerm). There are a lot of modules obviously and you’re not going to need them all. At a minimum for this solution you’ll need;
- AzureRM
- AzureRM.profile
- AzureRM.Compute
Upload them under the bin directory also as shown below.

Test that our script dependencies are accessible
Now that we have our dependent modules uploaded let’s test that we can load and utilise them. Below is commands to load the Invoke-Parallel script and test that it has loaded by getting the Help.
# Load the Invoke-Parallel Powershell Script
. "D:\home\site\wwwroot\RG-Start-Stop-VirtualMachines\bin\Invoke-Parallel.ps1"

# See if it is loaded by getting some output
Get-Help Invoke-Parallel -Full
Put those lines into the code section, hit Save and Run and select Logs to see the output. If successful you’ll see the help. If you don’t you probably have a problem with the path to where you put the Invoke-Parallel script. You can use the Kudu Console from the Function App Settings to get a command line and verify your path.

Mine worked successfully. Now to test our AzureRM Module Loads. Update the Function to load the AzureRM Profile PSM as per below and test you have your path correct.
# Import the AzureRM Powershell Module
import-module 'D:\home\site\wwwroot\RG-Start-Stop-VirtualMachines\bin\AzureRM.profile\2.4.0\AzureRM.Profile.psm1'
Get-Help AzureRM

Success. Fantastic.
Create an Azure Service Principal
In order to automate the access and control of the Azure Virtual Machines we are going to need to connect to Azure using a Service Principal with the necessary permissions to manage the Virtual Machines.
The following script does just that. You only need to run this as part of the setup for the Azure Function so we have an account we can use for our automation tasks. Update line 6 for your naming and the password you want to use. I’m assigning the Service Principal the “DevTest Labs User” Azure Role (Line 17) as that allows the ability to manage the Virtual Machines. You can find a list of the available roles here.
Take note of the key outputs from this script. You will need to note the;
- ApplicationID
- TenantID
I’m also securing the credential that has the permissions to Start|Stop the Virtual Machines using the example detailed here in Tao’s post.
For reference here is an example to generate the keyfile. Update your path in line 5 if required and make sure the password you supply in line 18 matches the password you supplied for the line in the script (line 6) when creating the Security Principal.
Take note of the password encryption string from the end of the script to pair with the ApplicationID and TenantID from the previous steps. You’ll need these shortly in Application Settings.
Additional Dependencies
I created another sub-directory under the function app site named ‘keys’ again using WinSCP. Upload the passkey file created above into that directory.

Whilst we’re there I also created a “logs” directory for any erroneous output (aka logfiles created when you don’t specify them) from the invoke-parallel script.

Application Variables
Using the identity information you have created and generated we will populate variables on the Function App, Application Settings that we can then leverage in our Function App. Go to your Azure Function App, Application Settings and add an application setting (with the respective values you have gathered in the previous steps) for;
- AzureAutomationPWD
- AzureAutomationAppID
- AzureAutomationTennatID (bad speed typing there)
Don’t forget to click Save up the top of the Application Settings screen.

The Function App Script
Below is the sample script for your testing purposes. If you plan to use something similar in a production environment you’ll want to add more logging and error handling.
Testing the Function
Select the Test option from the right-hand side pane and update the request body for what the Function takes (mode and resourcegroup) as below. Select Run and watch the logs. You will need to select Expand to get more screen real estate for them.

You will see the VM’s enumerate then the script starting them all up. My script has a 30 second timeout for the Invoke-Parallel Runspace as the VM’s will take longer than 30 seconds to startup. And you pay for use, so we want to keep this lean. Increase the timeout if you have more VM’s or latency that doesn’t see all your VM’s state transitioning.

Checking in the Azure Portal I can see my VM’s all starting up (too fast on the screenshot for the spfarm-mim host).

Sample Remote PowerShell Invoke Script
Below is a sample PowerShell script that is remotely calling the Azure Function and providing the info the Function takes (mode and resourcegroup) the same as we did in the Test Request Body script in the Azure Function Portal. This time to stop the VMs.

Looking in the Azure Portal and we can see all the VMs shutting down.

Summary
A foundational implementation of an Azure Function App to perform orchestration of Azure Virtual Machines.
The Function App is rudimentary in that the script exits (as described in the Runspace timeout) after 30 seconds which is prior to the VMs fully returning after starting|stopping. This is because the Function App will timeout after 5mins anyway.
Now to workout the enhancements to it.
Finally, yes I have renewed/changed the Function Key so no-one else can initiate my Function 🙂
Follow Darren Robinson on Twitter