Remember the good old days of working from home, or checking your email/doing research for whatever you were working on and you had to plug-in the phone line to the modem and dialup your ISP or employer to access the internet? The upgrade to ISDN and having quick dial on demand access? Then the consumerization of WiFi and DSL and having always on connectivity to the internet from home.
Now in 2017 with the ubiquity of WiFi and typical house renovations and extensions you end up with a myriad of devices providing connectivity for entertainment, home automation and everything in-between. That is where my house was at (until a month ago). Add to it two high school students leveraging the interwebs for study, social and gaming means the heterogeneous organically grown network environment no longer holds up.
Something needed to change, but what? During my research I stumbled across others investigating the same predicament. I didn’t want another stop-gap band-aid solution. I wanted enterprise grade services that were reliable and affordable. Inspired by Troy Hunt’s posts here and here and some similar conversations with colleagues I sat in front of the TV and YouTube for a day over a recent long weekend and devised a plan that would work for my house and my family.
What did I want ?
With my consultant hat on I defined my requirements;
- Centralised administration
- i.e. not having to log into 3 different Wi-Fi access points to change configuration, find connected devices etc
- Maximise throughput across Wi-Fi and ethernet to the internet
- 802.11ac for Wi-Fi
- Full 5G coverage
- Gbit ethernet for connected wired devices
- Enterprise Grade VPN for integration with IaaS Services
- Security integration (video monitoring). Tactical first, ubiquitous coverage later
- Reporting and Auditing
- Who’s connecting
- What devices are doing what
Ubiquiti UniFi ticked all the boxes and based on positive local reviews I jumped in.
The Plan
What replaces what?
- Telstra cable broadband all-in-one modem, router, firewall, access point
- The modem function stays enabled as it is HFC but will be put into Bridge Mode with the other functions (firewall and routing) to now be provided by the Ubiquiti Edge Router
- Billion switch and access point
- At the other end of the house from the incoming Telstra connection I had a Billion all-in-one device. That was decommissioned and replaced with a Ubiquiti in-wall 802.11ac uni
- Cisco 8 port Gb Switch
- This was replaced with the Ubiquiti 8 port managed switch (which includes 4 POE switch ports)
- Apple Airport Expresses (x2)
- These were located in two dead zones wired in via ethernet but also acting as access points. They provided coverage for the outdoor entertaining areas, the pool, the downstairs lounge and the brewhouse. They were replaced with Ubiquiti 802.11ac Lite WiFi access points
In addition I also purchased the;
- Ubiquiti CloudKey to control everything and store the configuration
- I added an additional Ubiquiti in-wall 802.11ac unit in my sons bedroom. This gives maximum Wi-Fi coverage for him and his sister, but also an ethernet outlet to connect to his docking station for his MacBook and online gaming
- UniFi Video G3 IR HD Camera. Only one to start with to test a few scenarios out. If it works out it will be supplemented with additional units
- I had two Apple TV’s. One wired and one on Wi-Fi only. These were the 3rd Gen units and whilst they worked they really were apple centric. So streaming music to all units (including Airport Express) reliably meant using iTunes on a computer. I replaced these with Chromecast units (a combo of Audio and Video)
- Google Home to play nicely with the Chromecast and introduce a home automation assistant to the house though my existing Hue lights.
Putting it all together
Having invested the time in research, I’d watched a number of videos/tutorials from Chris and Willie. Check out this quick start guide from Chris and Willie’s tutorials here.
I took note of the configuration I had on my existing Telstra unit as I had some static address leases configured and a couple of ports enabled on the firewall. I installed the Ubiquiti Discovery Tool Chrome Extension on the laptop.
Essentially the process went like this:
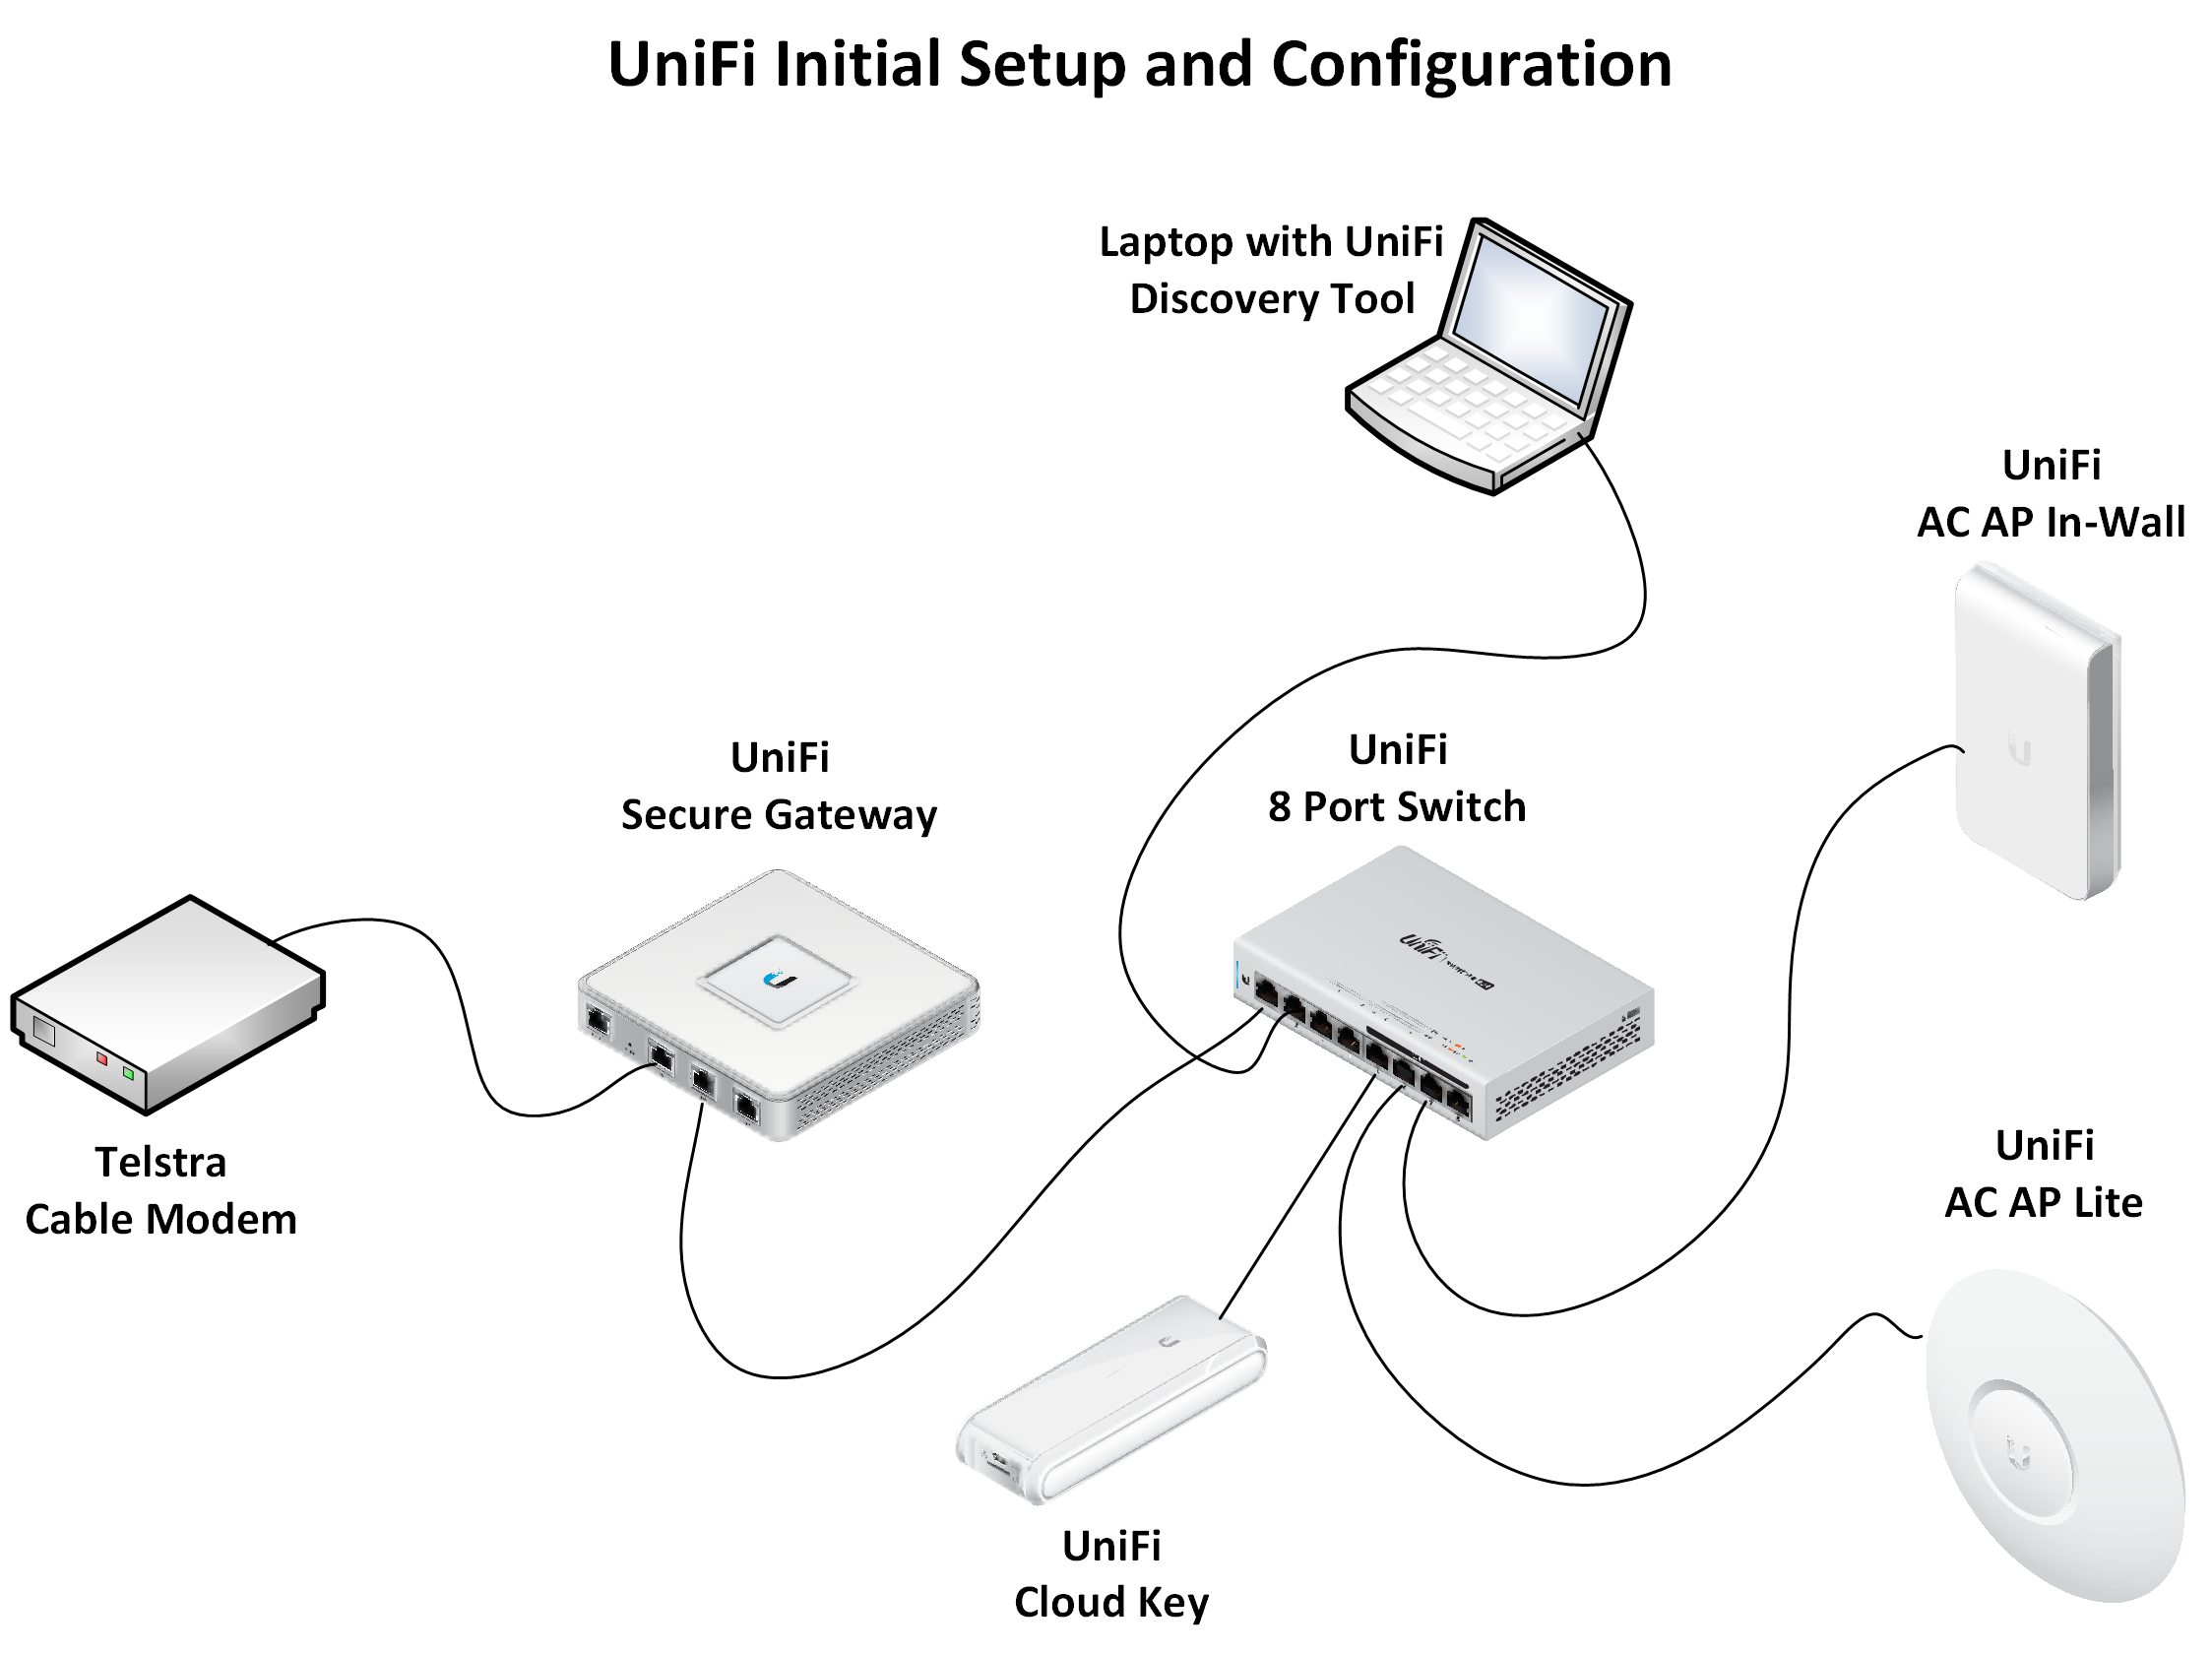
- Telstra Cable Broadband Ethernet connection to UniFi Security Gateway WAN Port
- LAN Port of the UniFi Security Gateway connected to UniFi Switch
- CloudKey connected to a UniFi POE Switch Port
- Laptop connected via Ethernet to a UniFi Switch Port
- UniFi AP-AC-Lite POE injector LAN Port connected to a UniFi Switch Port. UniFi AP-AC-Lite POE injector POE port connected to a UniFi AP-AC-Lite
- UniFi Switch POE Port connected to the UniFi AC AP InWall unit
- Via WiFi I connected to the existing Telstra modem configuration page and changed WAN port to Bridged Mode
- I then turned off WiFi on the Telstra Modem using the button on the front
- Powered on all the UniFi equipment and waited 5 mins
That all looked pretty similar to this
- In the browser on the Ethernet connected laptop I went to 192.168.1.1 and could see the Unify Gateway had got an address and the configuration looked good
- I started the Device Discovery Tool Chrome Extension, clicked on the UniFi Family button in the top right and let it find the devices on the network. It found all the network devices except the CloudKey. After clicking Find CloudKey it found the CloudKey.
I then followed this quick start guide from Chris. It was pretty straight forward and I followed my nose once I’d got through the first few steps. Pretty much everything had an update which I performed. I re-used the existing WiFi name I had previously to make reconfiguration easier to start with. But I did use a different subnet. As everything was pretty much DHCP enabled this didn’t cause any major probs. Just a couple of manual updates for the devices with static addresses.
Having just gotten off a 17hr flight from Dallas to Sydney and having been up for 14 hours before that, I forced myself back into the local timezone by performing the above. I had it all up and running within a couple of hours. Over the next few days I familiarised myself with the equip and the configs before physically locating all the components in their final resting spots.
Did I get what I wanted?
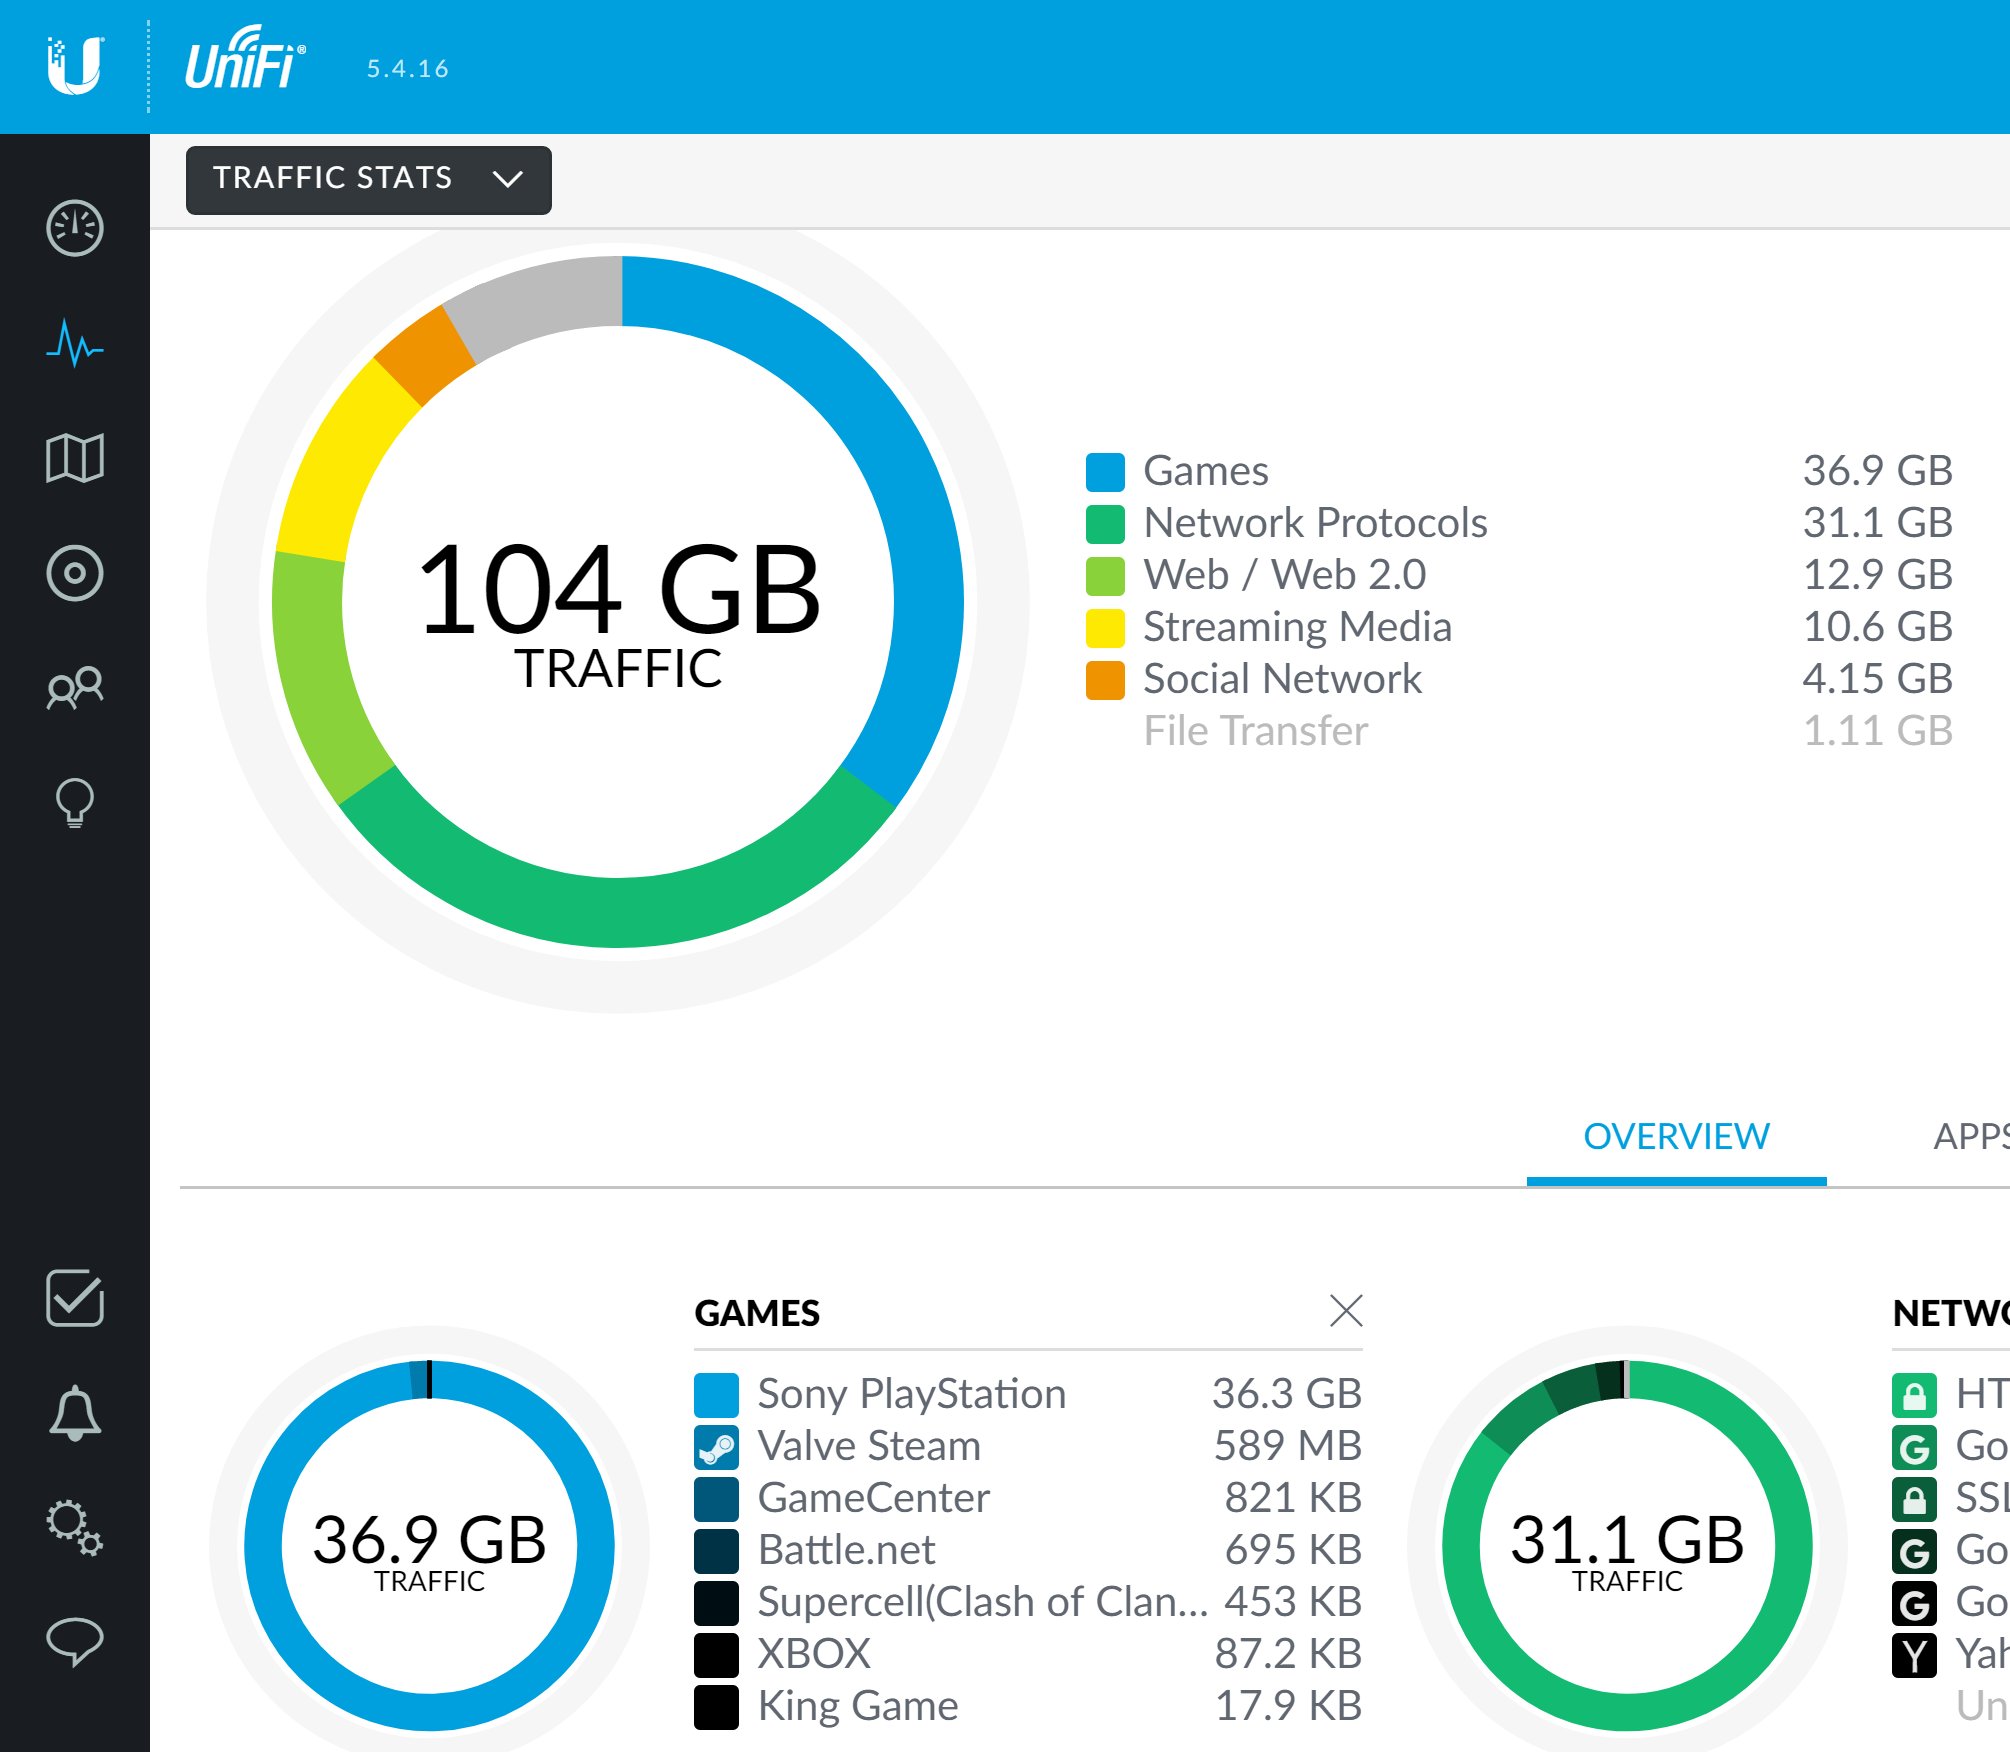
In fact it was the start of school holidays as I set everything up. As part of the initial configuration I enabled Deep Packet Inspection (DPI). The very next day looking into some of the features I noticed the following in the Statistics. Yes, my son had updated his Playstation games and had enjoyed a solid multi-hour gaming session with his mates online.
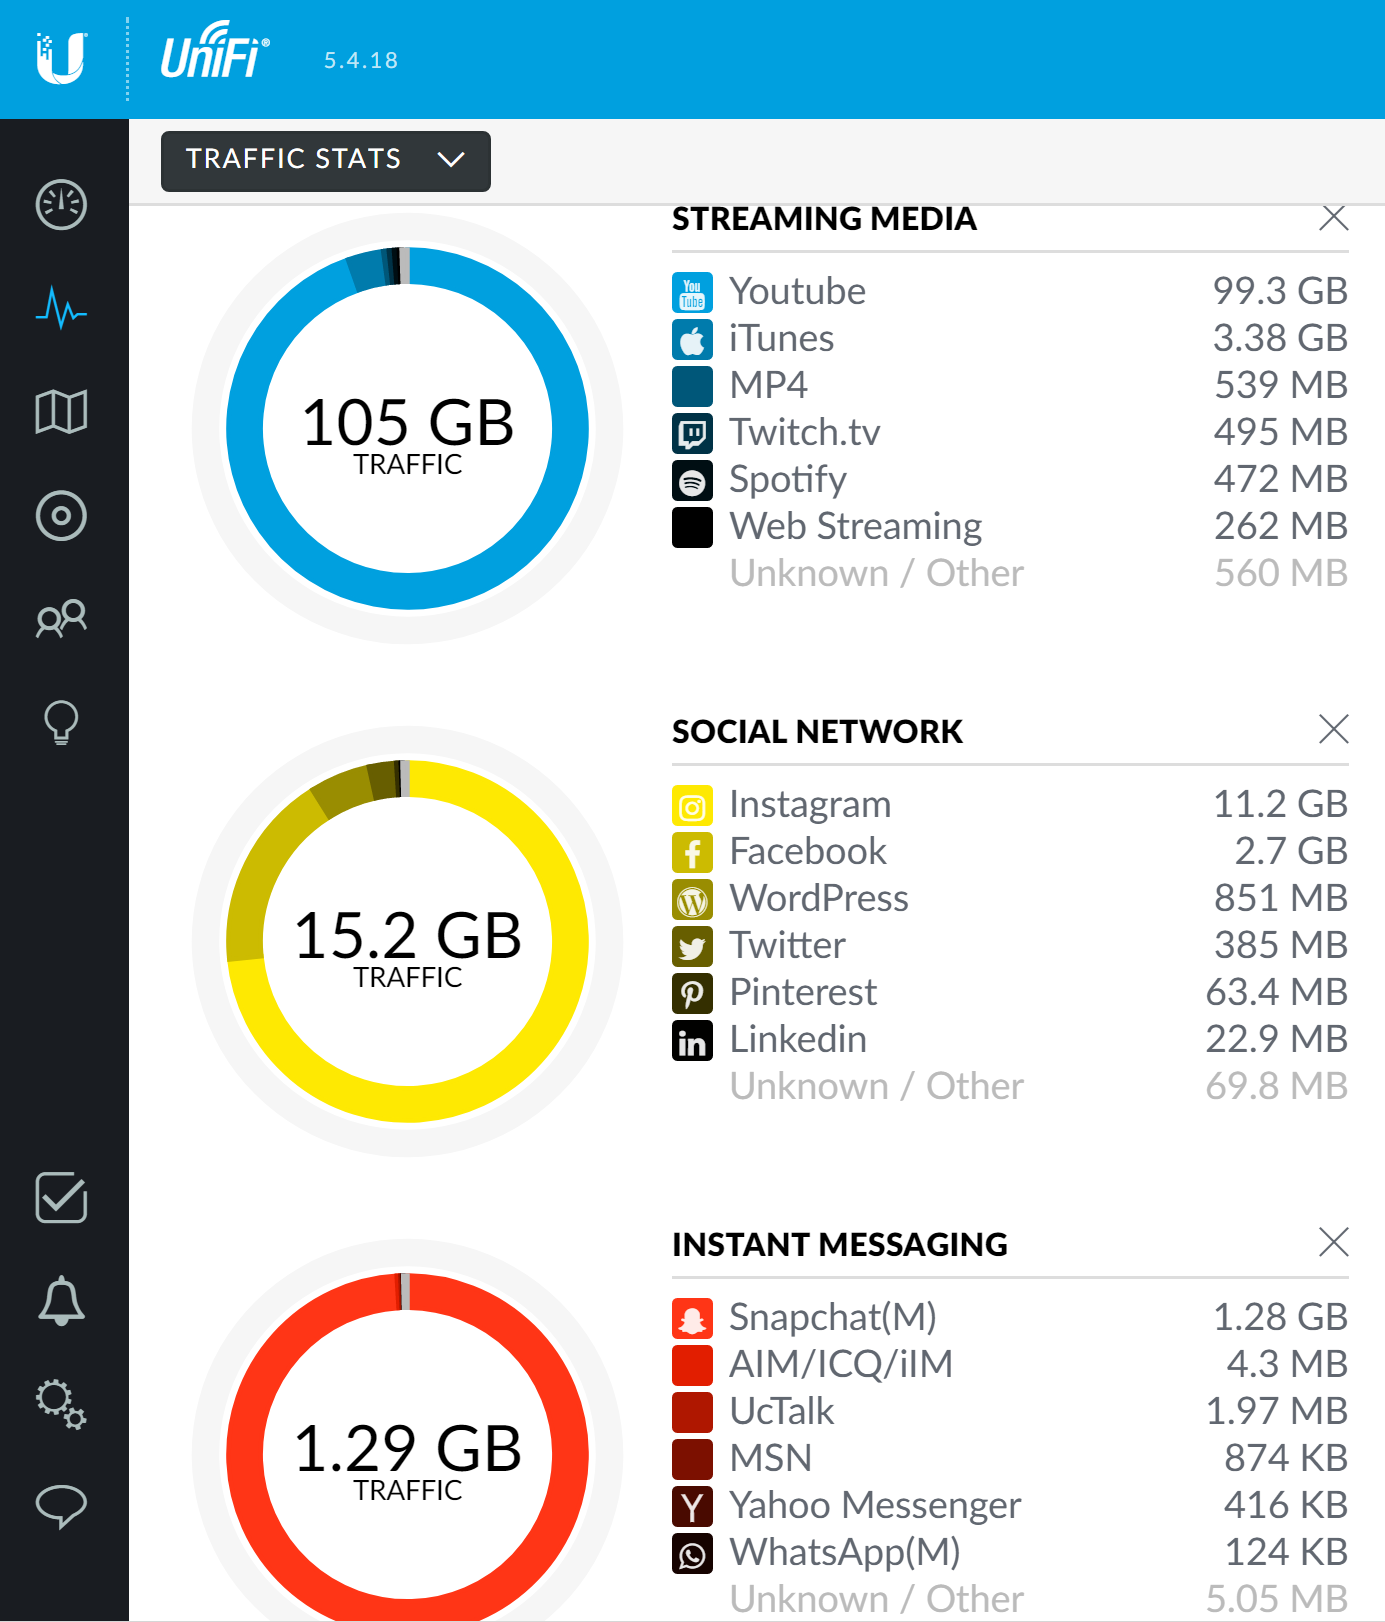
A couple of days later I noticed his sibling was keeping occupied with YouTube and iTunes whilst keeping in touch with her friends via Instagram and Snapchat. Combined with the Clients view I now had visibility what was connected and what was doing what on the home network. Even better with Cloud Access enabled I can do this at any time from anywhere.
WiFi Network Coverage
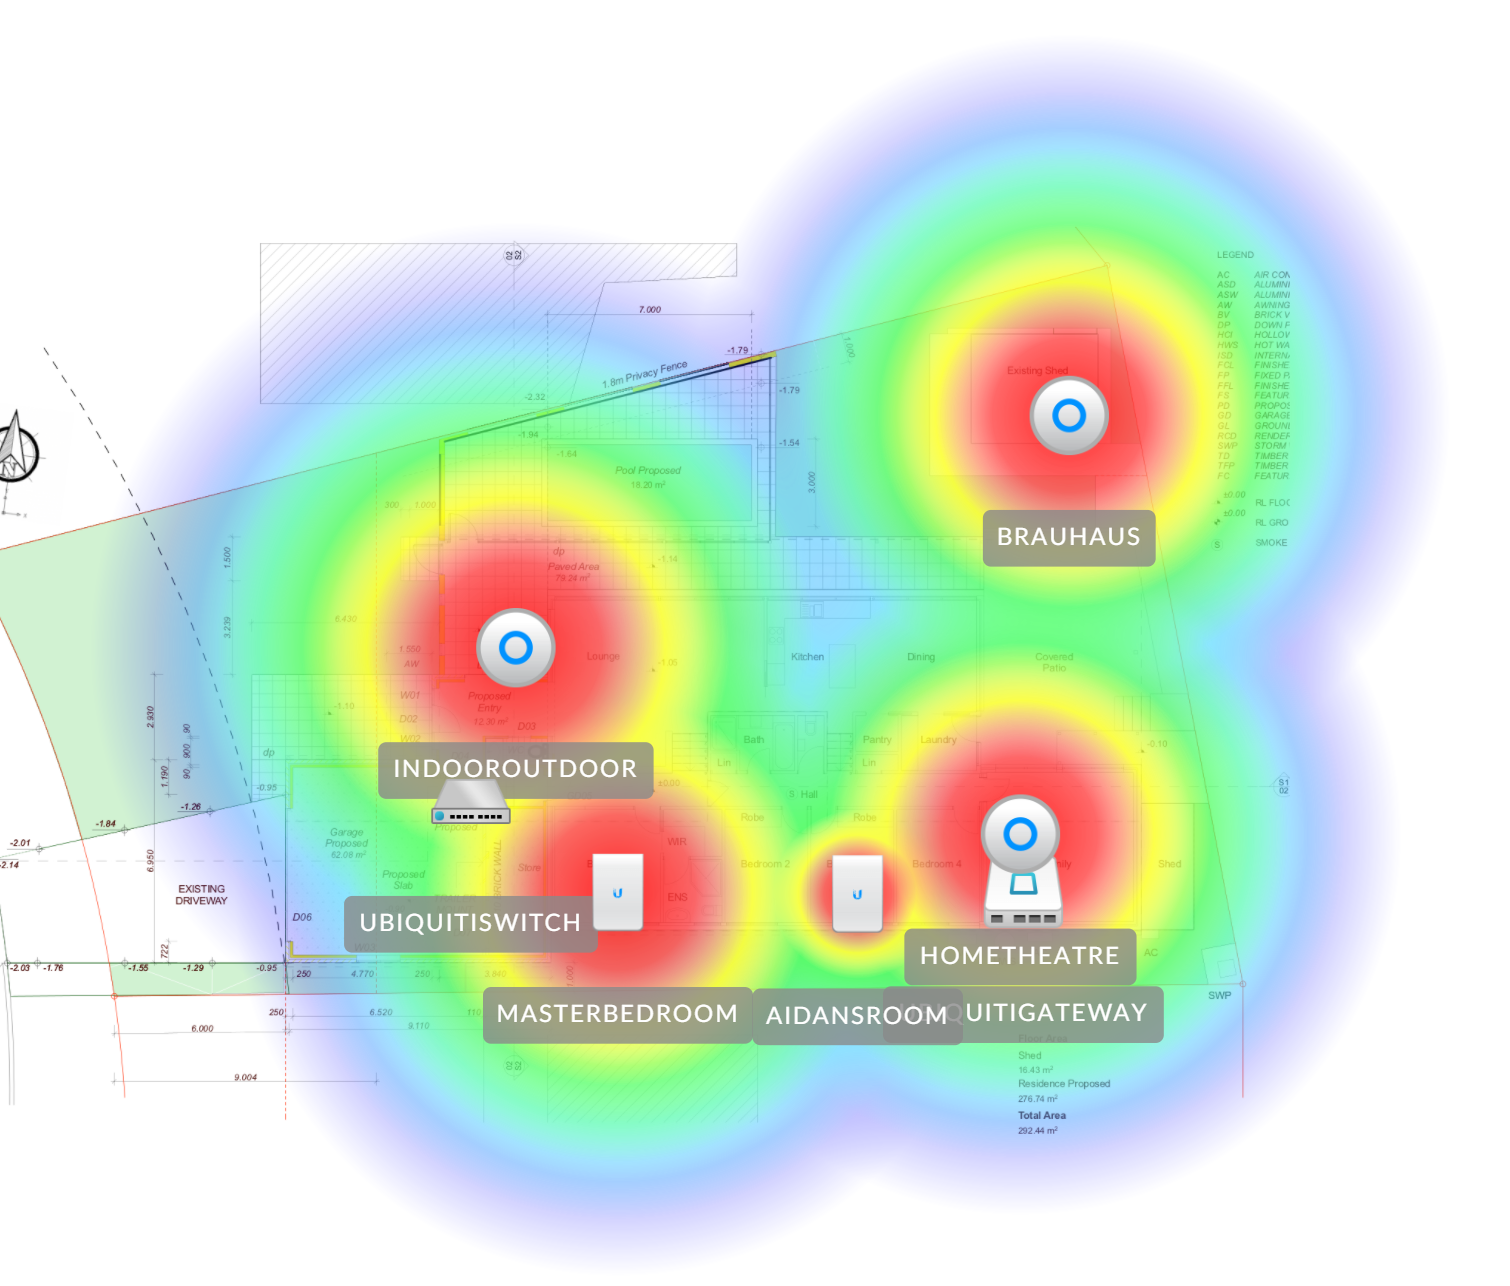
This was one of the big things I wanted to fix. The footprint of the property where I require full coverage is just over 350m2 (3767 sq ft). And ideally that coverage should be 5G. Using the Map functionality I uploaded the house/property plan and placed the units where I installed them and configured the map for the appropriate dimensions. I started out with all the Access Points configured with full power and Auto channel. The 2G coverage map looks like this. That’s some pretty good coverage.

The 5G coverage map looks like this. A small spot where coverage isn’t anticipated to be full, but I haven’t encountered any issues with connectivity possibly as the devices used there aren’t using 5G because they can’t or have dropped back to 2G. I’ll keep an eye on it, but maybe another AP in the pantry to cover the kitchen with full 5G maybe a future option.
Configuration Updates
There was a series of firmware updates for all the devices about a week after the initial setup. After updating the Cloud Key, USG and Switch I spotted the “managed rolling upgrade” option and used that for the Access Points. Nice and simple. The Group Config option is also very nice allow the selection of multiple devices and making the same config change to all of them.
Camera Setup
The camera setup was so simple I was second guessing myself as to whether I’d done it correctly. I’d purchased the G3 HD Camera but held off on the NVR as I wanted to have a play and make sure I was happy with it first as I’ve had many unfavourable experiences with video cameras in the past. In doing my pre-purchase research I’d identified that Ubiquiti provide the NVR software for free for Windows and Linux.
I had an old laptop doing nothing, so I put Ubuntu on it, installed the NVR software and bam, it discovered my camera. Integrated with my Ubiquiti account means I can also access the camera and recordings from anywhere. I have the camera permanently fixed and configured to record on motion. It just works. Nighttime IR motion recording also works well.
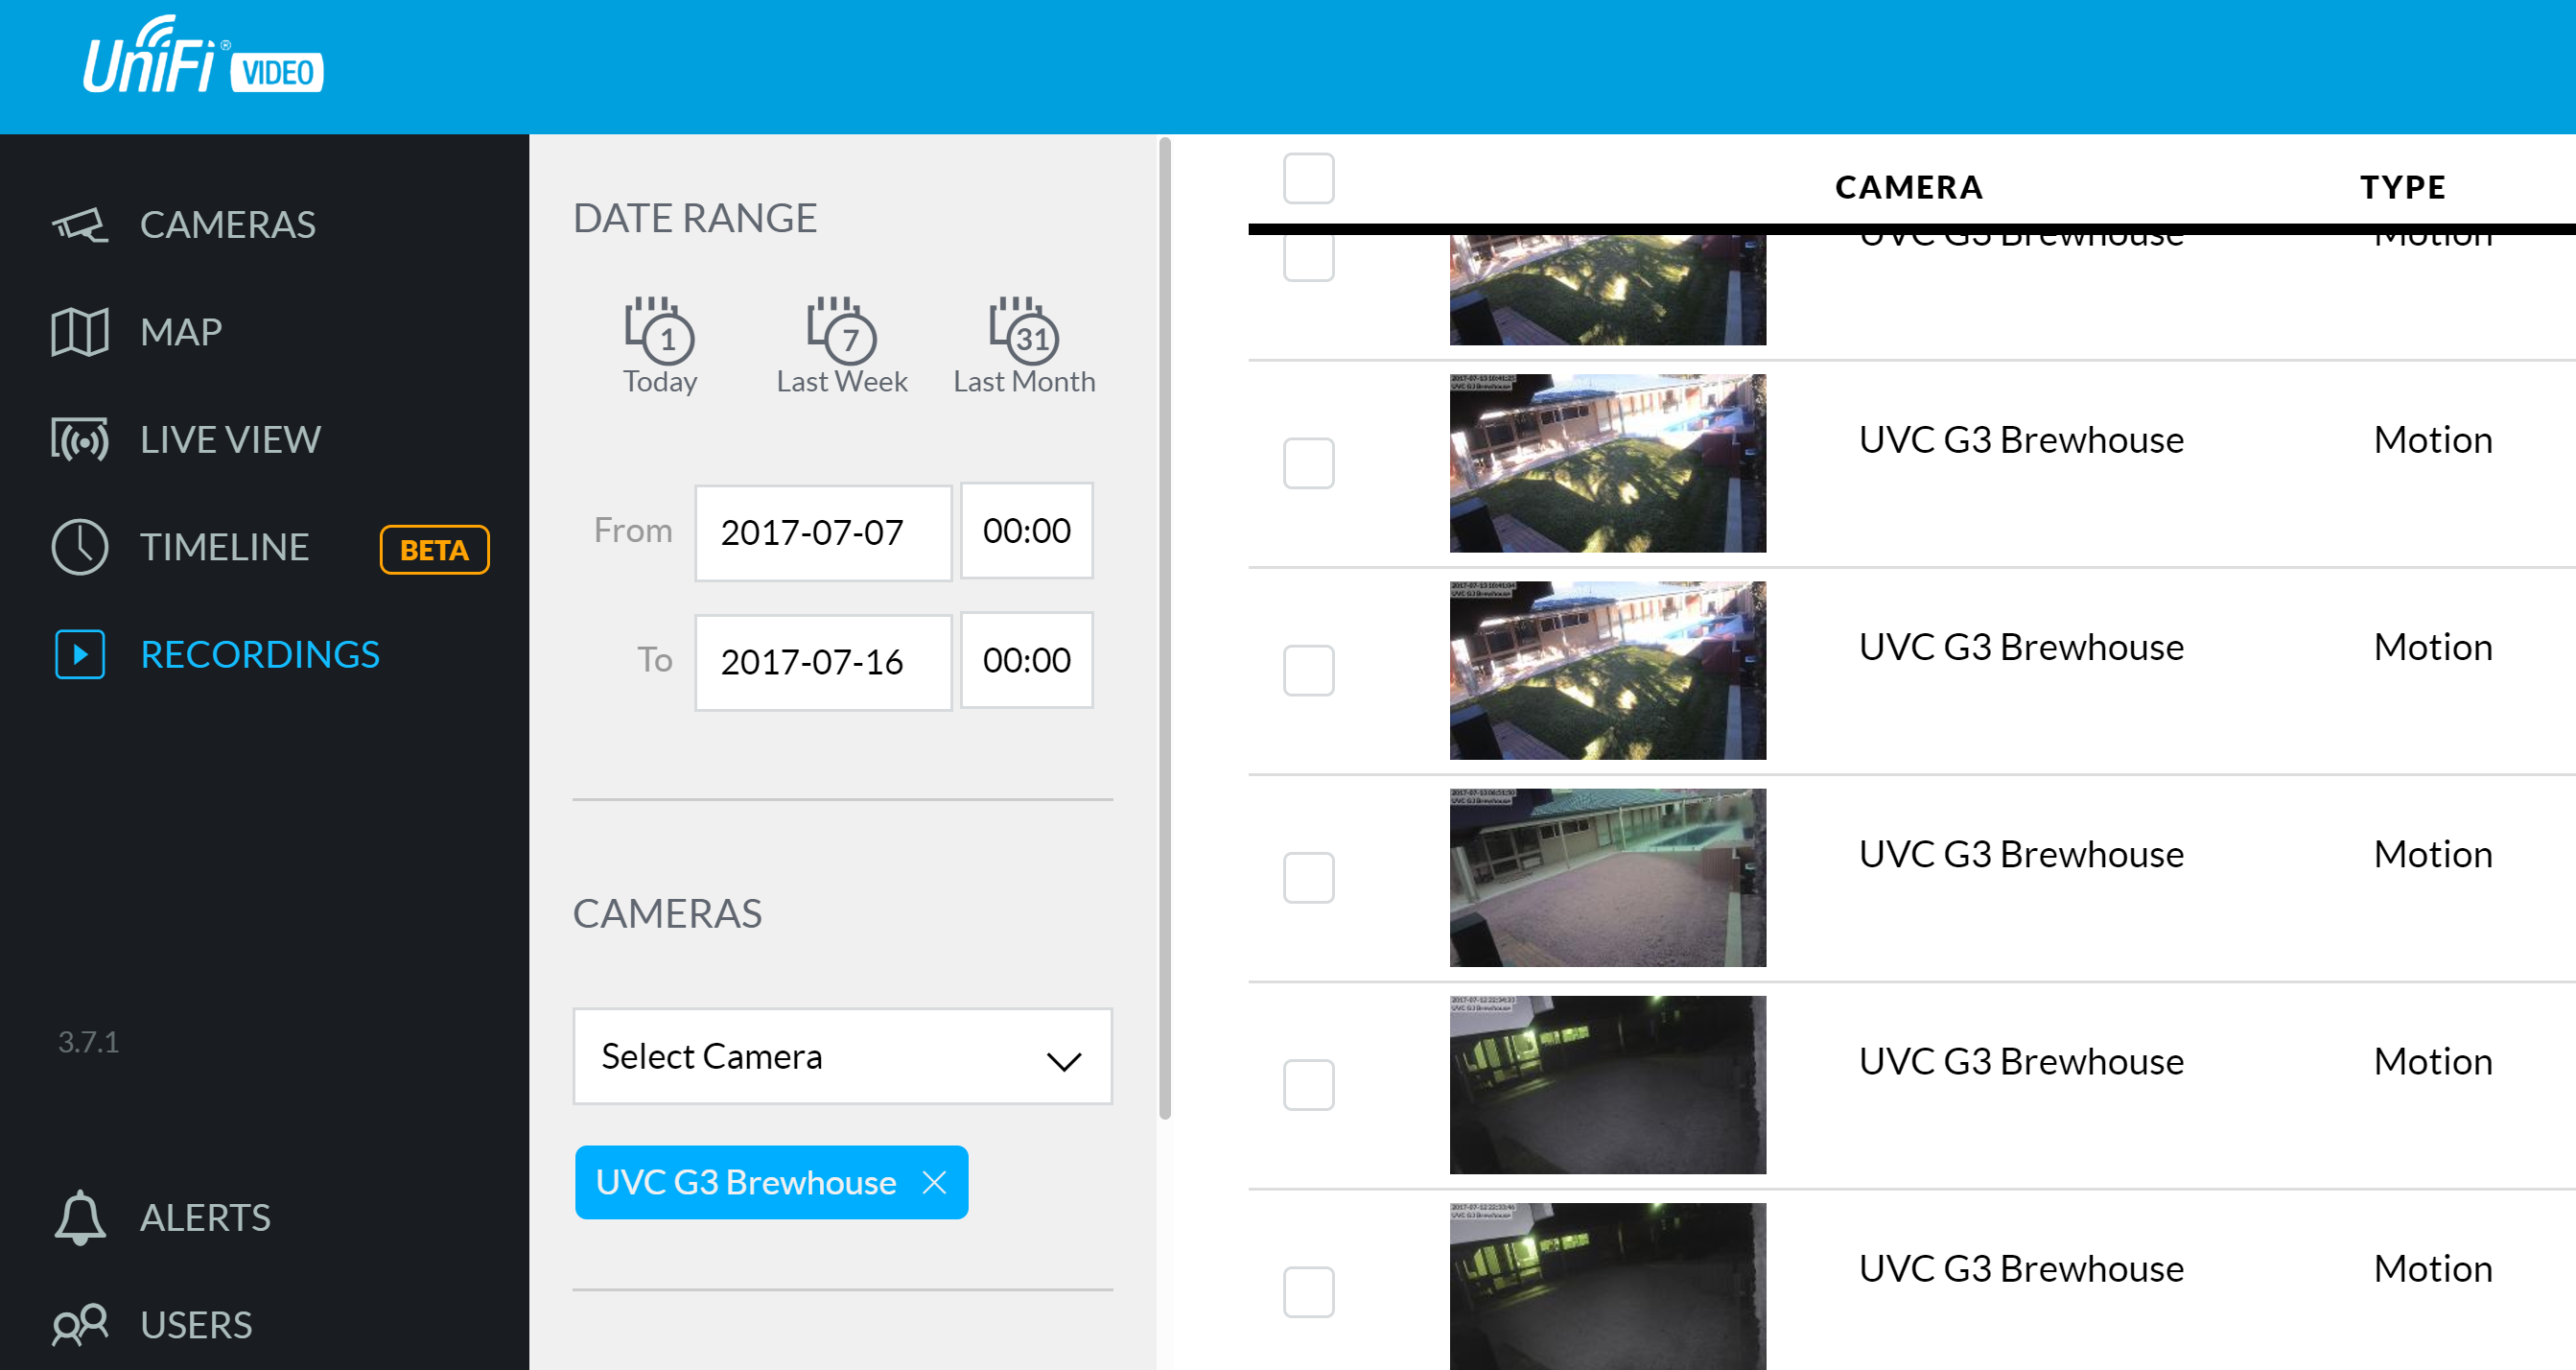
The Timeline feature is very nice. Quickly catchup on the guard dogs irregular patrols of his back yard 🙂

VPN Setup
This is one piece I haven’t finished exploring and getting to where I want yet. I’ve attempted to create a site-to-site VPN from home to Azure which works but doesn’t appear to hold connection. More testing and configuration required.
Summary
Three weeks on and I’m extremely happy with the equip and its performance. I took the opportunity to also check each fly-lead attached to each device in the house and I biffed anything that wasn’t rated or was less that Cat 5E.
With school holidays coming to an end, and the network being performance tested daily with YouTube, Netflix, Sony Entertainment Network, FaceTime, Skype for Business etc, it hasn’t missed a beat. In fact I haven’t heard a peep about poor internet access, lagging online game performance, long ping times etc which I’m sure are common phrases other parents of millennial teenagers would know.


