


As much as I love PowerShell Azure Functions anytime I need to develop a new one leveraging a service as an output binding I cringe. I cringe as documentation for examples leveraging output bindings typically don’t have a PowerShell example. Take my most recent requirement for Azure Functions SendGrid Output Binding with PowerShell and the documentation is non existent.
With some searching I can see a few others have been in this position before me, but their examples only got me part of the way. In this post I’ll detail how I got the Azure Functions SendGrid Output Binding with PowerShell working.
Prerequisites
This post expects you to already be up to speed with PowerShell Azure Functions (and I’m using the now supported PowerShell 7 version). In my environment I also developed the Functions using SendGrid as an Output Binding locally and then deployed them to Azure. In order to implement the details contained in this post you will therefore need;
- An Azure Function App (PowerShell)
- A PowerShell Azure Function (I’m using an HTTPTrigger Function in this example)
- to create an Azure SendGrid Account
- and then use the Manage link on the Azure SendGrid Account to validate your SendGrid Account and verify your Sender Identity. See the image below.
- You will also need to generate a SendGrid API Key that will be used in your Function to integrate with SendGrid.

- In the local.settings.json file for your Azure Function add a variable to contain your SendGrid API key. In my example I named mine ‘SendGrid‘

Adding and Configuring SendGrid as an Output Binding
First you need to add the Output Binding.
- right click on your Function and select Add Binding

- Select Output => SendGrid

- accept ‘message‘ as the name to identify the binding

- Select the Application Setting ‘SendGrid‘ that contains your SendGrid API key as configured earlier.

- press enter to leave blank “To address“, “From address“, “Message Subject” and “Message Text” as we’ll generate these in the Azure Function.

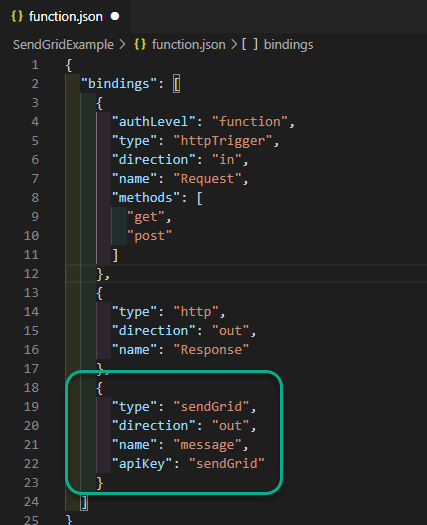
- The SendGrid Output Binding will then be added to your Azure Function
Using SendGrid from a PowerShell Azure Function
Now that we have the SendGrid Output Binding configured it’s time to use it. Above in the screenshot where I created the variable for the SendGrid API key you can see I have two other Application Settings for “sendGridToAddress” and “sendGridFromAddress“. In my example below I’m sending messages to a static address. So I am using these variables for the configuration of the From and To addresses. The “sendGridFromAddress” variable is what I previously validated as a Sender Authority in SendGrid.
Shown below is the format of the email message output object to send from the Azure Function to SendGrid. Effectively all that needs to be passed is where the message is going, where it is coming from (the validated SendGrid email address), the subject of the email message and the content. The format below pulls the from and to addresses from the Application Settings variables. The subject and content are PowerShell variables from your Azure Function (run.ps1) that you’ve generated as part of your function.
The final part is to push the generated content to SendGrid via the output binding. This is achieved by using Push-OutputBinding along with the object name we configured when creating the binding (message) and the variable containing the message from above ($mail) converted to JSON.
Push-OutputBinding -Name message -Value (ConvertTo-Json -InputObject $mail -Depth 4) That’s all there is to it. Now to explain the gotcha. When converting the PowerShell Message Object ($mail) to JSON, the values need to be strings for the conversion and the push to SendGrid to be successful. In the code block above you can see I have “to”, “from”, “subject” and “content” values all contained within strings e.g. “$(<$variablename>)”.
Testing SendGrid Integration
In order to test end-to-end functionality we need to complete our Azure Function and trigger it with our dynamic data (subject and content). Then wait for the email to arrive.
Here is the run.ps1 for a working PowerShell Azure Function (albeit with no error handling) with SendGrid and HTTPResponse Output Bindings. It leverages the Function Application Settings for our “to” and “from” address and takes the Subject and Content from the HTTP Post request on the HTTPTrigger based Function.
Triggering our locally developed (in VSCode) Azure Function from within a PowerShell script in VSCode looks like this.
$sendGridFunctionURL = 'http://localhost:7071/api/SendGridExample'
$sampleBody = '{
    "Subject":  "My Email Subject",
    "messageContent":  "Here is a message sent via an Azure Function and SendGrid"
}'

Invoke-RestMethod -Method Post `
-Uri $sendGridFunctionURL `
-Body $sampleBody

A few minutes later we have a message received in the destination mailbox.

Summary
Having a working example will help you get up and running quickly with Azure Functions SendGrid Output Binding with PowerShell. If you want to change the message format to HTML simply change the Content Type from text/plain to text/html. Then provide the content in HTML format. Using the PowerShell ConvertTo-Html function is good for this.