


22 Nov 18 Part 2 is available here that details accessing
the Docker Image via Azure Cloud Shell / SSH
27 Nov 18 Part 3 is available here that details customizing
an image and accessing it via other SSH clients with
elevated access.
PowerShell Desktop Virtual Environments
If you’ve been working with PowerShell for any length of time you know that through its flexibility there can come challenges when using disparate PowerShell Modules and often their version dependencies. This isn’t just a PowerShell thing; Python can also trip you up in a similar manner.
Python however has Virtual Environments (virtualenv) capabilities which provides functionality to create an environment that contains all the necessary binaries required for the packages/libraries that a Python project would need. I’ve found this this very useful and I’ve wondered why I couldn’t do the same for PowerShell Desktop (not Core). PowerShell Desktop, PowerShell Core?
PowerShell Desktop vs PowerShell Core
As of August 2016 there are two PowerShell versions;
- PowerShell Desktop
- PowerShell 5.1 that runs on Windows and on top of the full .NET Framework stack
- PowerShell Core
- PowerShell Core 6.x that is cross platform (Windows, MacOSX, Linux)
- Doesn’t run on the full .NET Framework
- PowerShell Core 6.x that is cross platform (Windows, MacOSX, Linux)
If you are a Windows/Directory Services Admin the likelihood of many of the PowerShell Modules you use running on PowerShell Core are slim. That’s because a lot of the modules you use require the full .NET Framework. And that isn’t available in PowerShell Core.
A Virtual PowerShell Desktop Env? Why is this only possible now?
In July this year Microsoft started providing Windows Container Images for the Insider releases (over and above Nano and Core OS builds). This was great, but meant you needed to be on the Insider Builds and were restricted to environments on physical hardware or VM’s migrated to Azure as there wasn’t an Azure Marketplace OS Version (Windows 10 or Server 2019 Preview) that met the minimum host requirements for the Insider Container images.
We’ve had to wait until Build 1809 became available in the Azure Marketplace which it did at the end of last week (w/e 18 November 2018). The Windows Container Version History shows that there was no 1803 Windows Image. But that’s all bygones now, as 1809 is finally here.
PowerShell Desktop Virtual Environments through Nested Virtualization
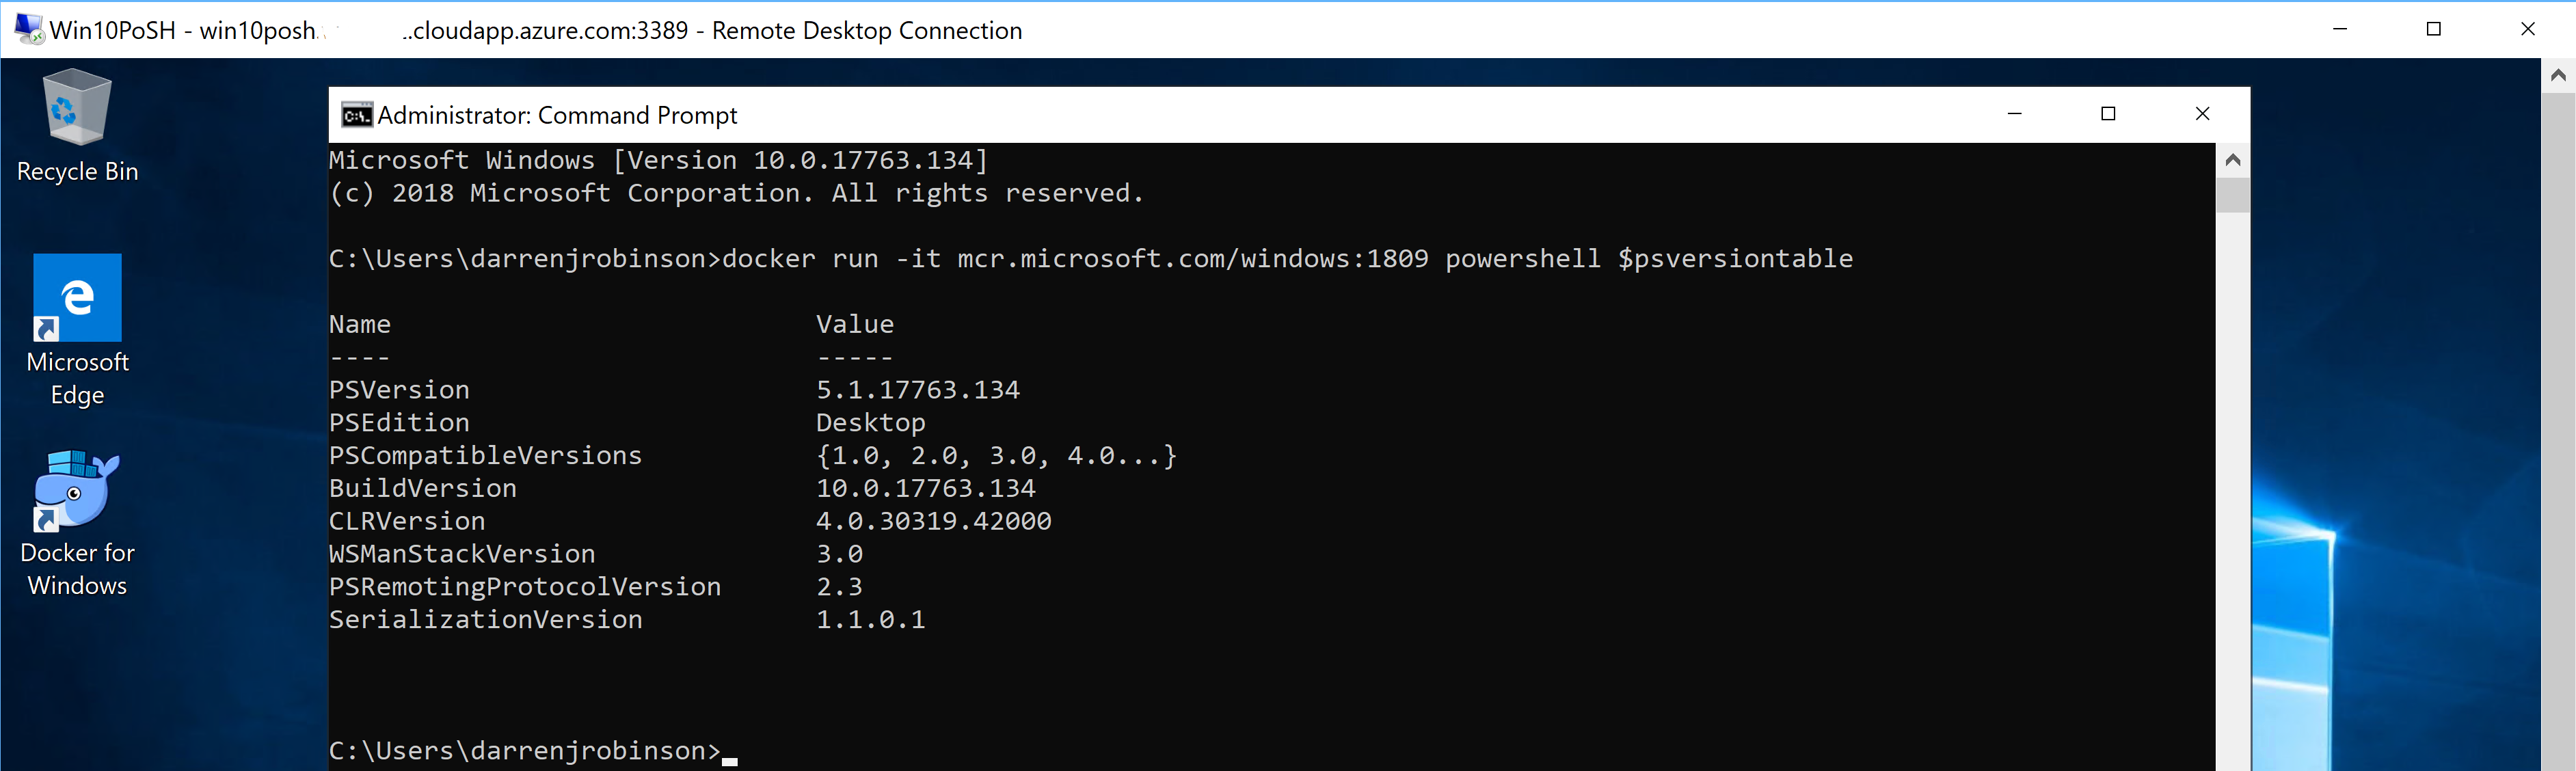
The screenshot below on first glance just looks like any command window in a virtual machine. But look a little closer;
- Remote Desktop Session to an Azure Windows 10 1809 Virtual Machine (host.region.cloudapp.azure.com)
- Docker Run Windows 1809 PowerShell $psversiontable
- PowerShell Desktop 5.1 via Docker inside a Virtual Machine in Azure
- BOOM!!
- PowerShell Desktop 5.1 via Docker inside a Virtual Machine in Azure
Ok, so that is a single Docker Container with a full Windows 10 1809 environment running inside a Windows 10 Virtual Machine. But that means we can also add more containers and have multiple isolated PowerShell environments. Something like ….
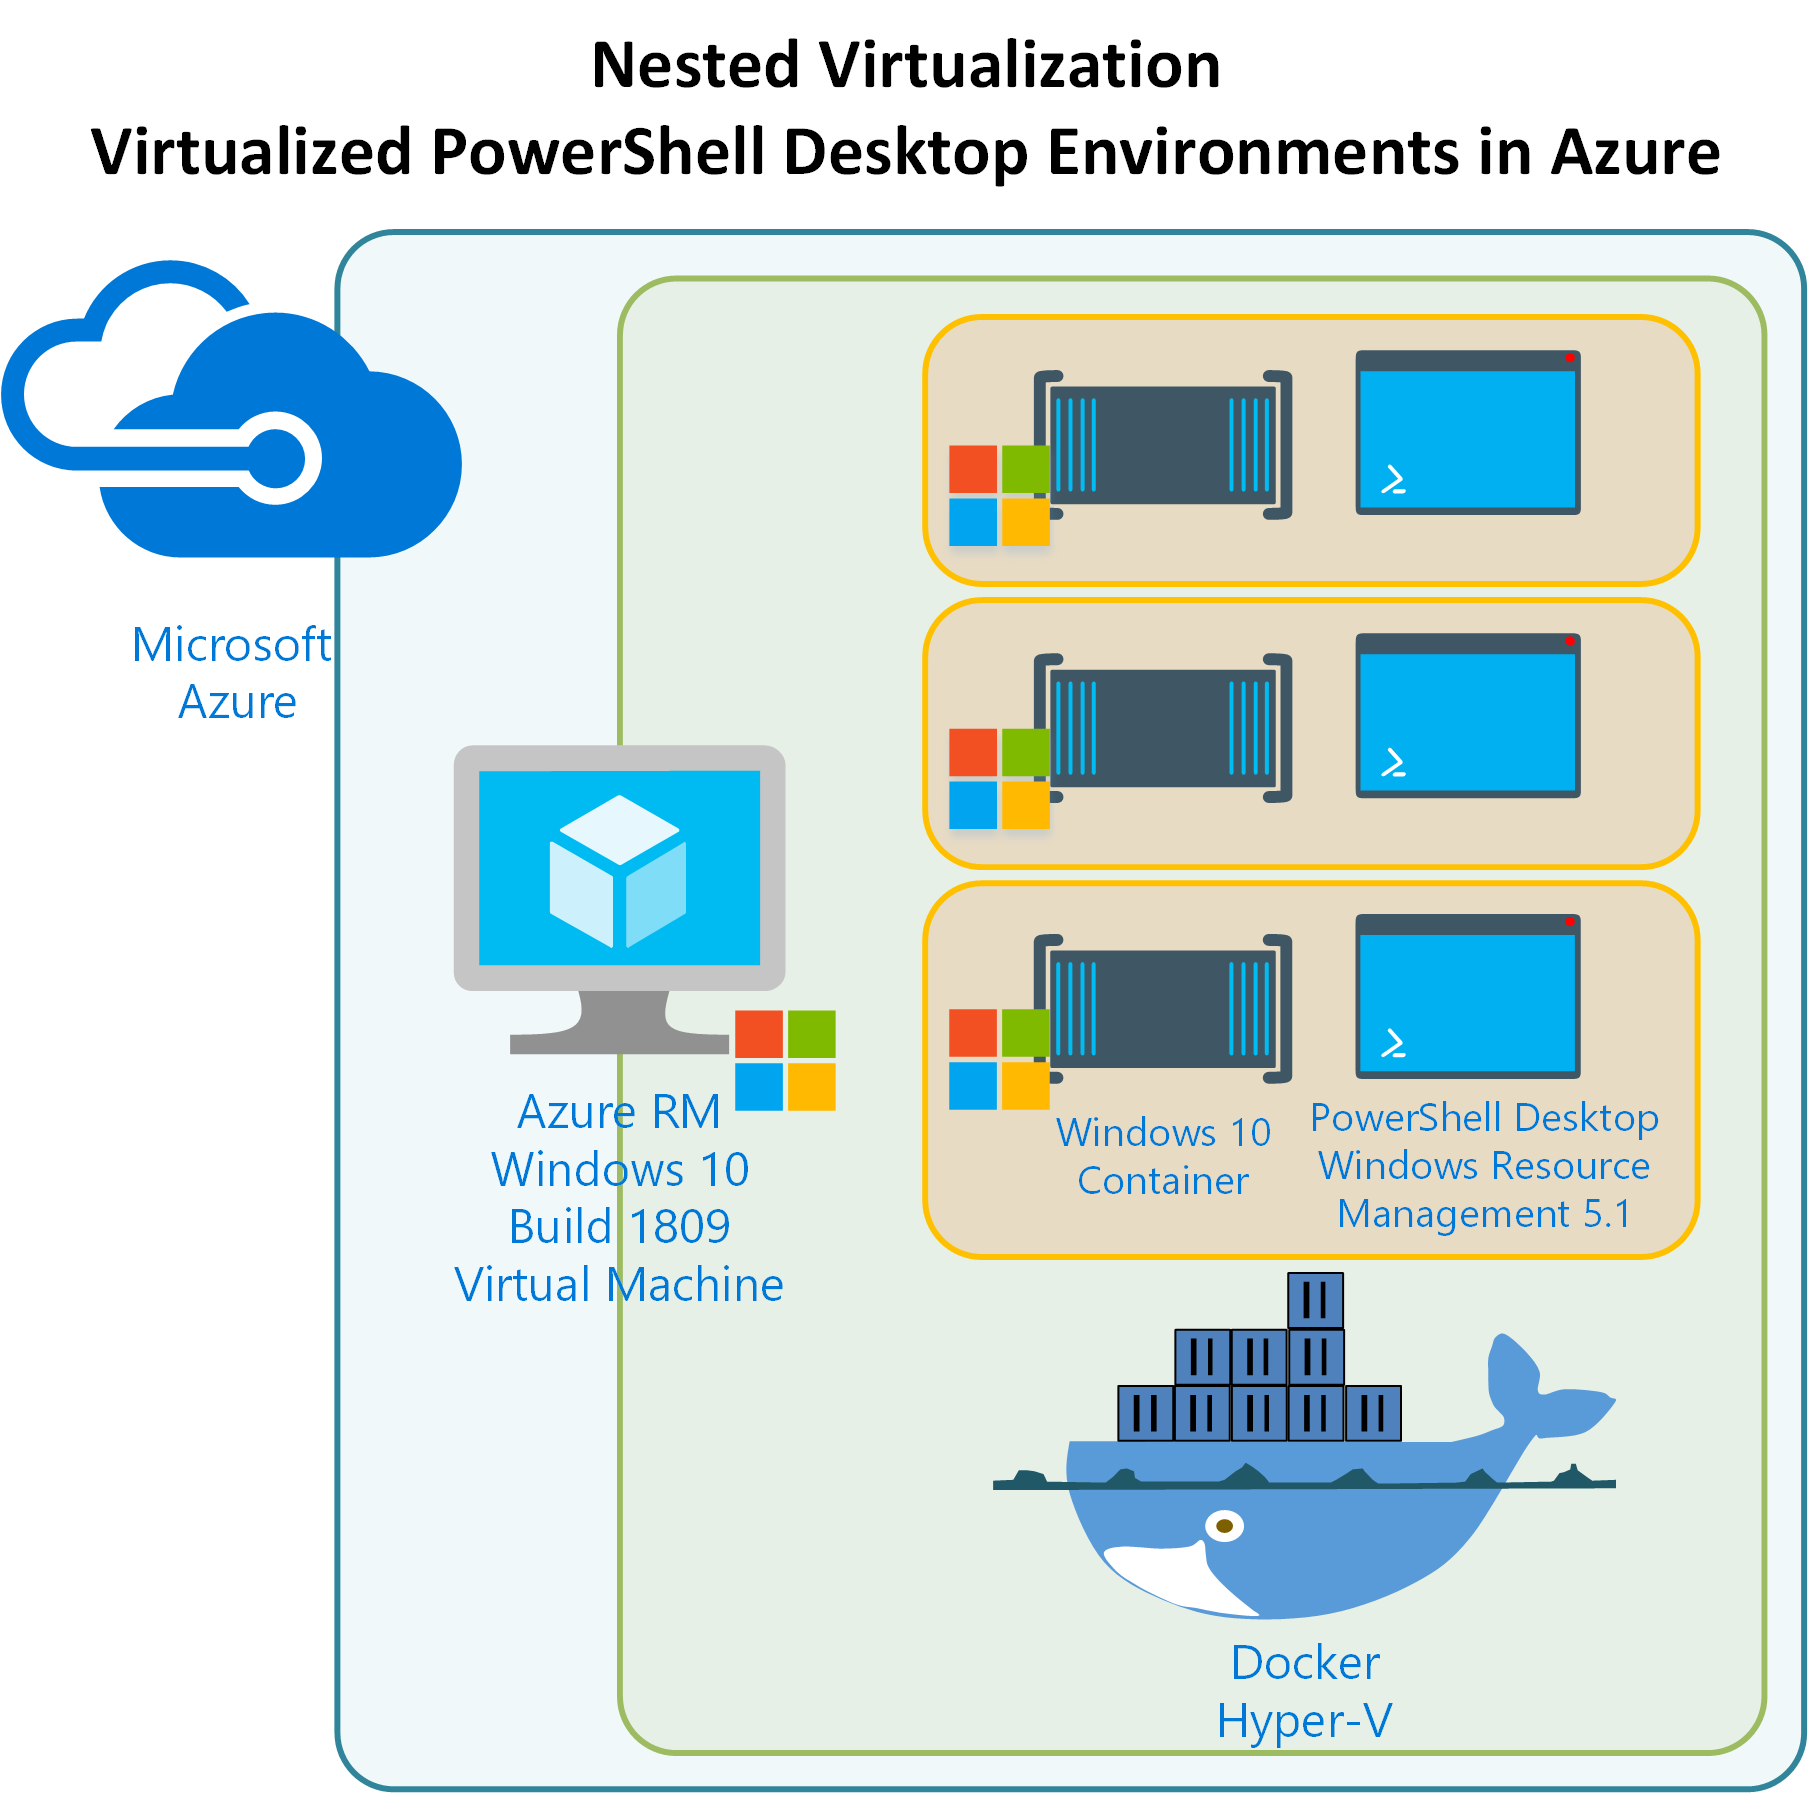
Wait, what, how? – The Overview
The high-level process is;
- Provision a Windows 10 Virtual Machine (Build 1809 or later).
- I recommend to deploy it in Azure, but you could do it in other virtualization environments that support Nested Virtualization
- NOTE: As I write this Windows Server 2019 Build 1809 hasn’t hit the Azure Marketplace. When it does, as it has a common code-base it should work exactly the same.
- Enable the OpenSSH Feature (I’ll be using this a little in this post but more in a future post)
- Enable the Containers and Hyper-V Features
- Install and configure Docker
- Pull the Windows Build 1809 Container Image
Windows 10 Build 1809 Virtual Machine
I’m not going to give step-by-step details for deploying a Windows VM in Azure. If you’re looking to setup Virtual PowerShell Desktop Environments with Docker you should be able to deploy a Windows VM. That said you need to choose a VM Size and Version that will support “Nested Virtualization”. The Azure RM Dv3 and Ev3 Series VM’s do. If you get an error similar to this when running a Docker Image then change your VM Series to Dv3. I went with;
- The Azure Marketplace has a image for Windows 10 Build 1809. Search for Windows 10 Pro, Version 1809
- In order to run this VM as pragmatic as practical I chose the following size and configuration for my VM initially
- Standard D2_v3 (2 vCPUs, 8 GB memory)
- HDD over SSD
- Un-managed disks
- Enable SSH and RDP in the NSG configuration
- initially we’ll need RDP to connect to the workstation
- moving forward we’ll be using SSH
- In order to run this VM as pragmatic as practical I chose the following size and configuration for my VM initially
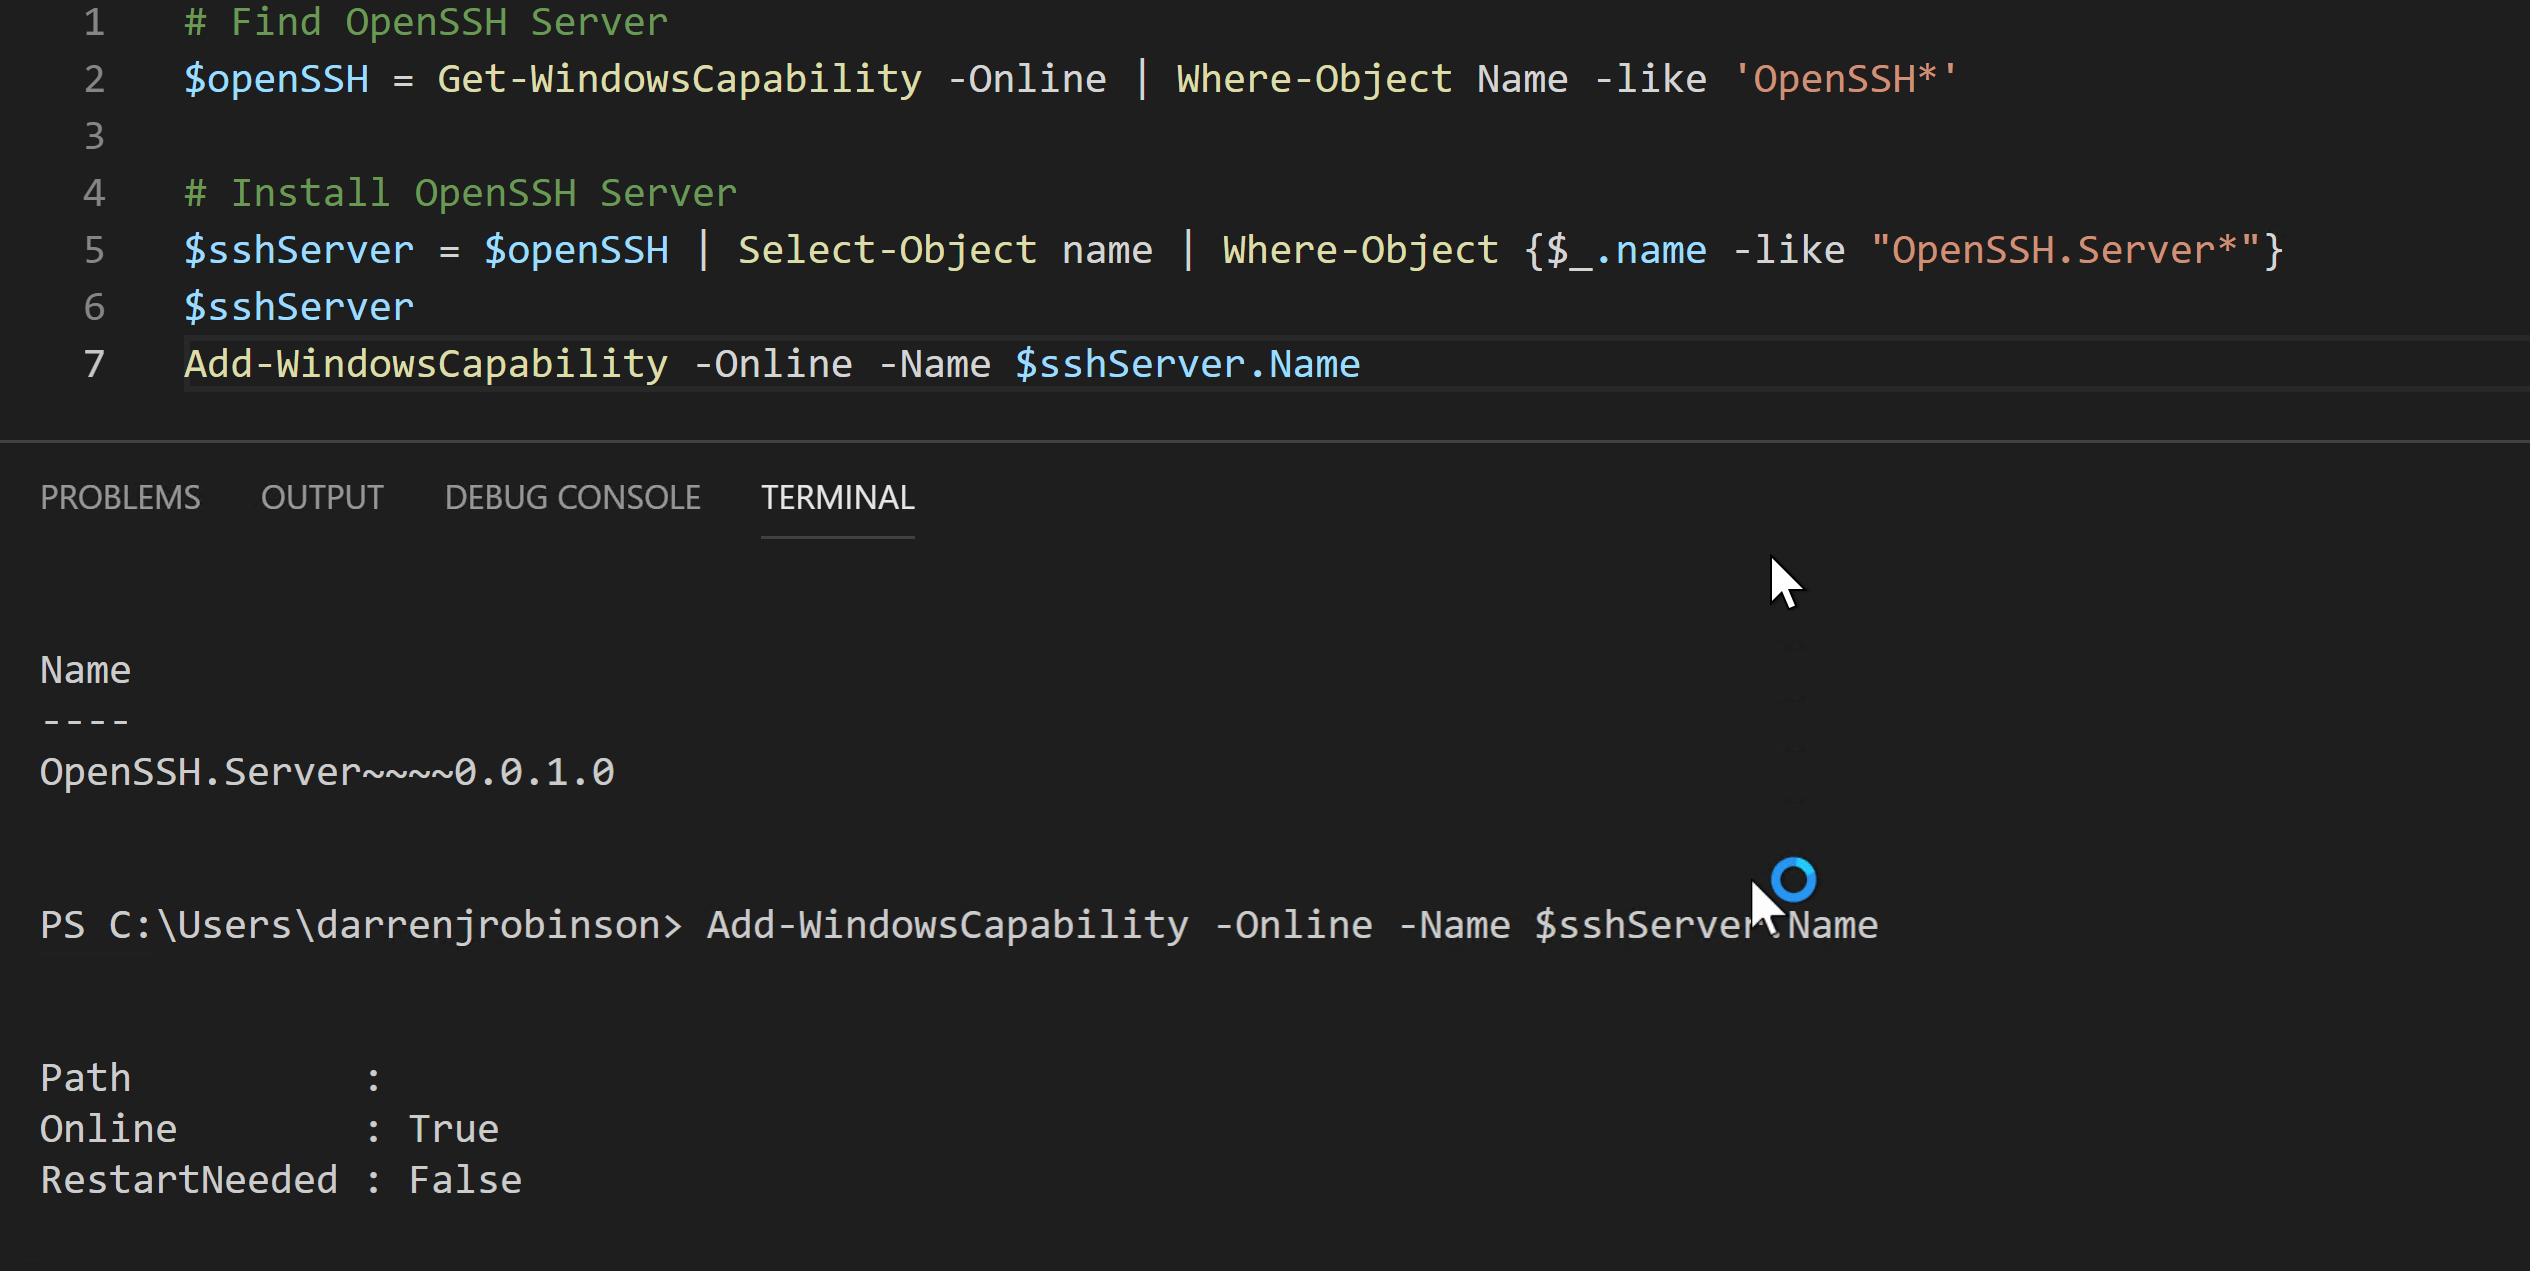
OpenSSH Server
OpenSSH Client and Server has been available for Windows for a while. Build 1809 though has streamlined the install process considerably. The base install and setup is now just a couple of commands away. The commands below will install the latest version of OpenSSH Server via PowerShell;
# Find OpenSSH Server
$openSSH = Get-WindowsCapability -Online | Where-Object Name -like 'OpenSSH*'

# Install OpenSSH Server
$sshServer = $openSSH | Select-Object name | Where-Object {$_.name -like "OpenSSH.Server*"}
$sshServer

Add-WindowsCapability -Online -Name $sshServer.Name
which when executed via VSCode looks like;
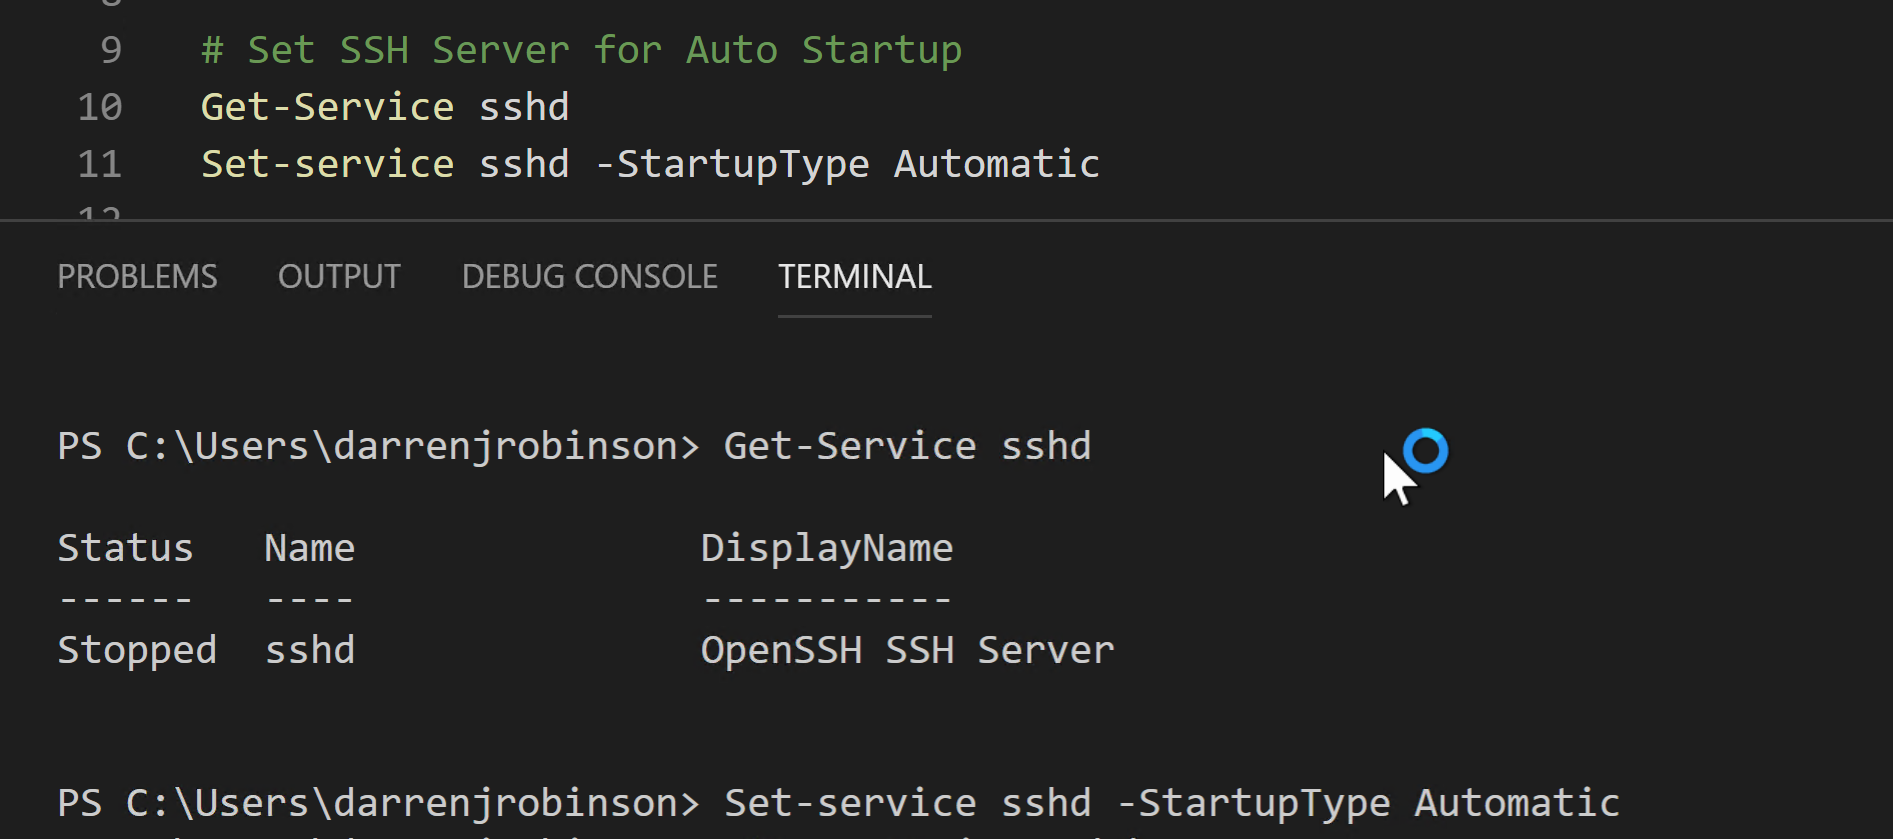
By default the SSH Server service is configured for Manual startup. To configure it for Automatic Startup use the Set-Service cmdlet.
# Set SSH Server for Auto Startup
Get-Service sshd
Set-service sshd -StartupType Automatic
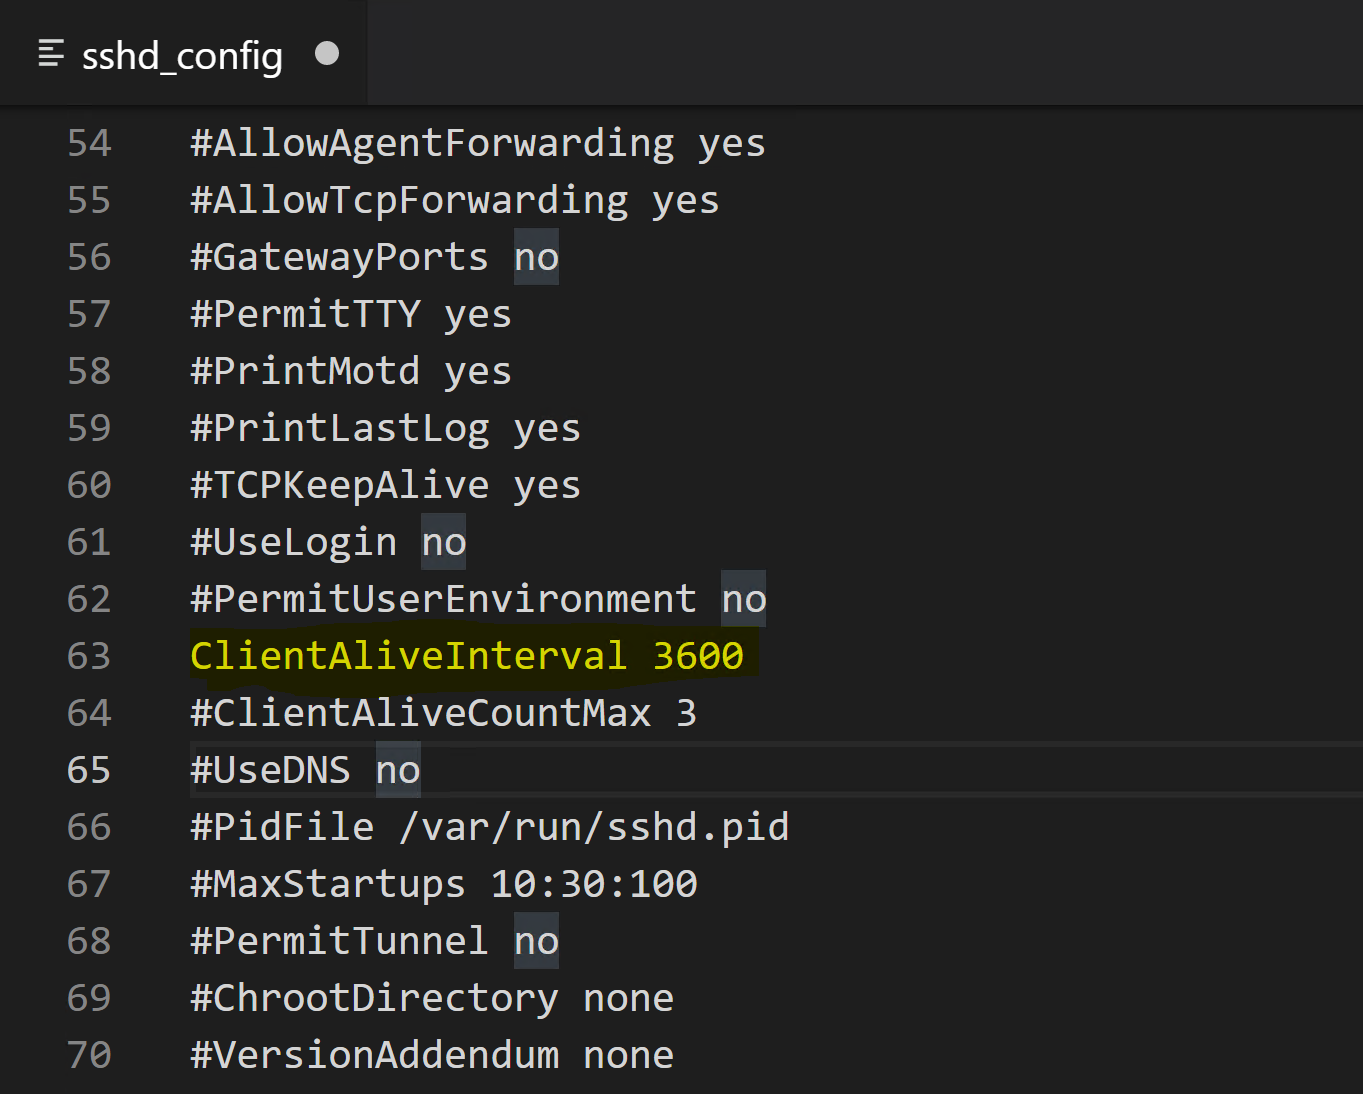
Finally we need to increase the ClientAliveInterval setting in the sshd_config configuration file located in the %programdata%\ssh directory. I’ve made mine 3600 seconds (1 hour).
Windows Containers / Docker Dependencies
# Install Containers / Docker Dependencies
Enable-WindowsOptionalFeature -Online -FeatureName containers –All -NoRestart
Enable-WindowsOptionalFeature -Online -FeatureName Microsoft-Hyper-V –All
Install Docker
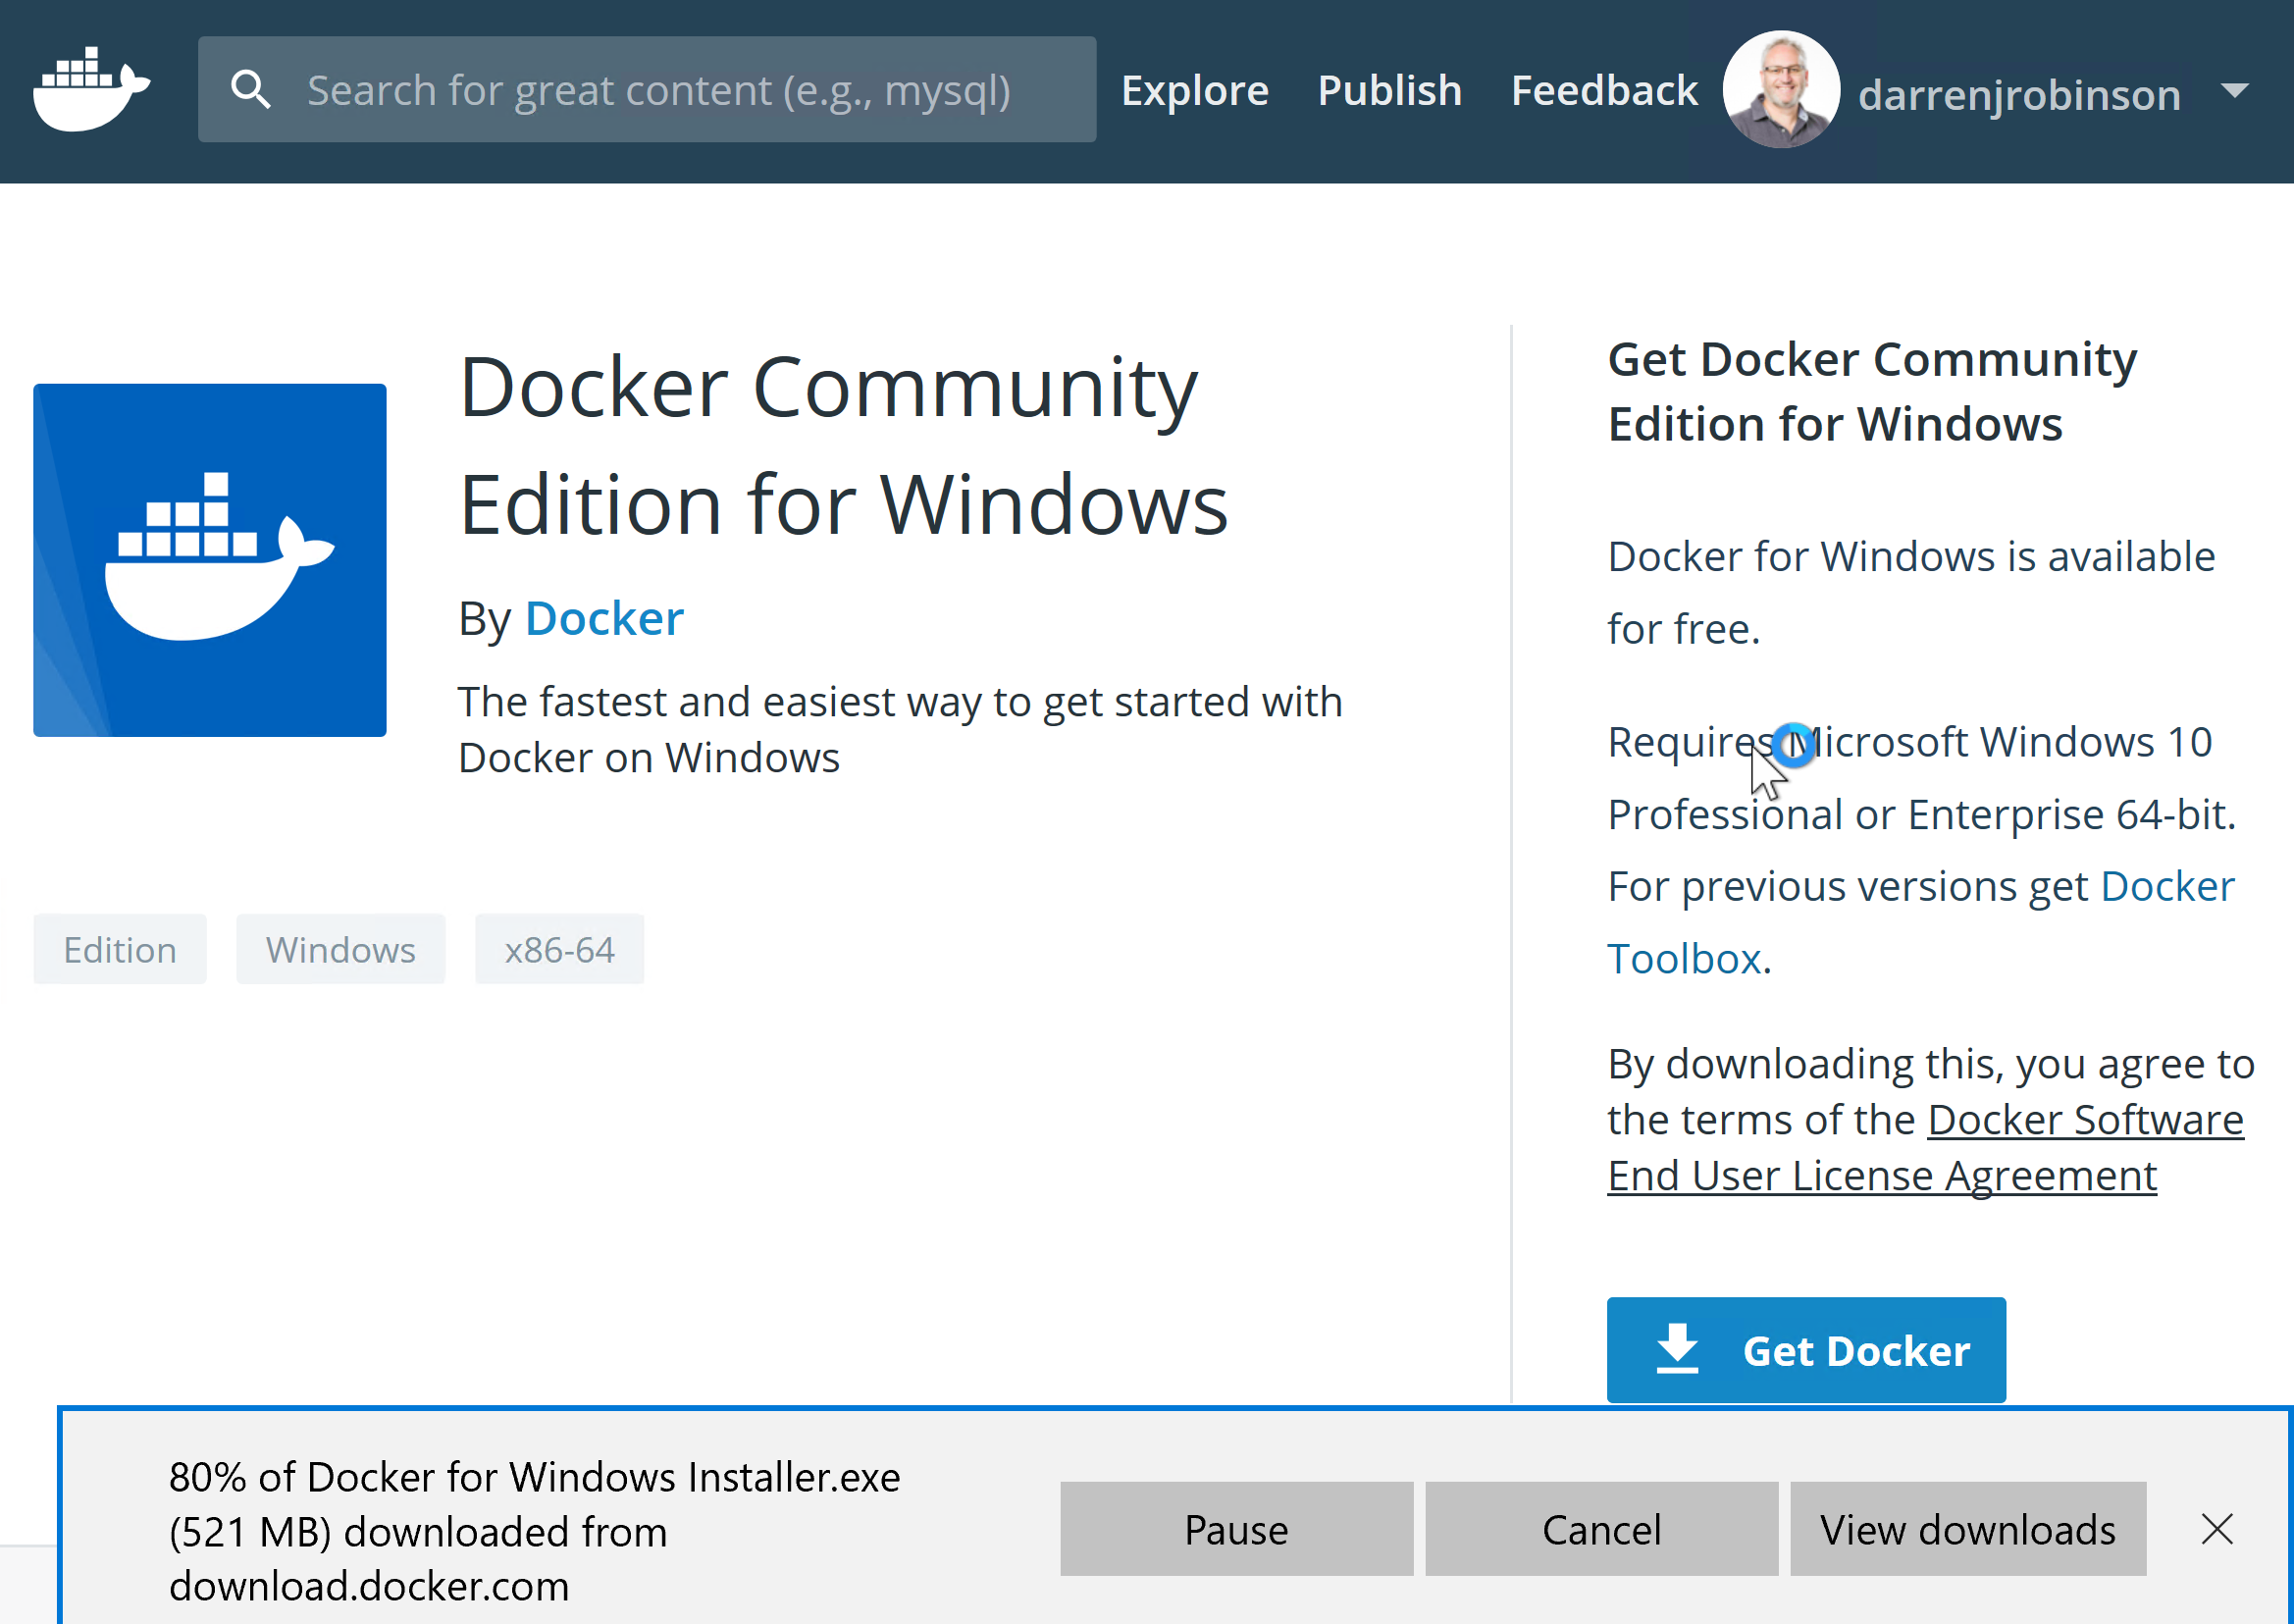
Head on over to Docker and login (or create an account if you don’t already have one). Get Docker CE for Windows. I’m running 18.06.1-ce-win73.
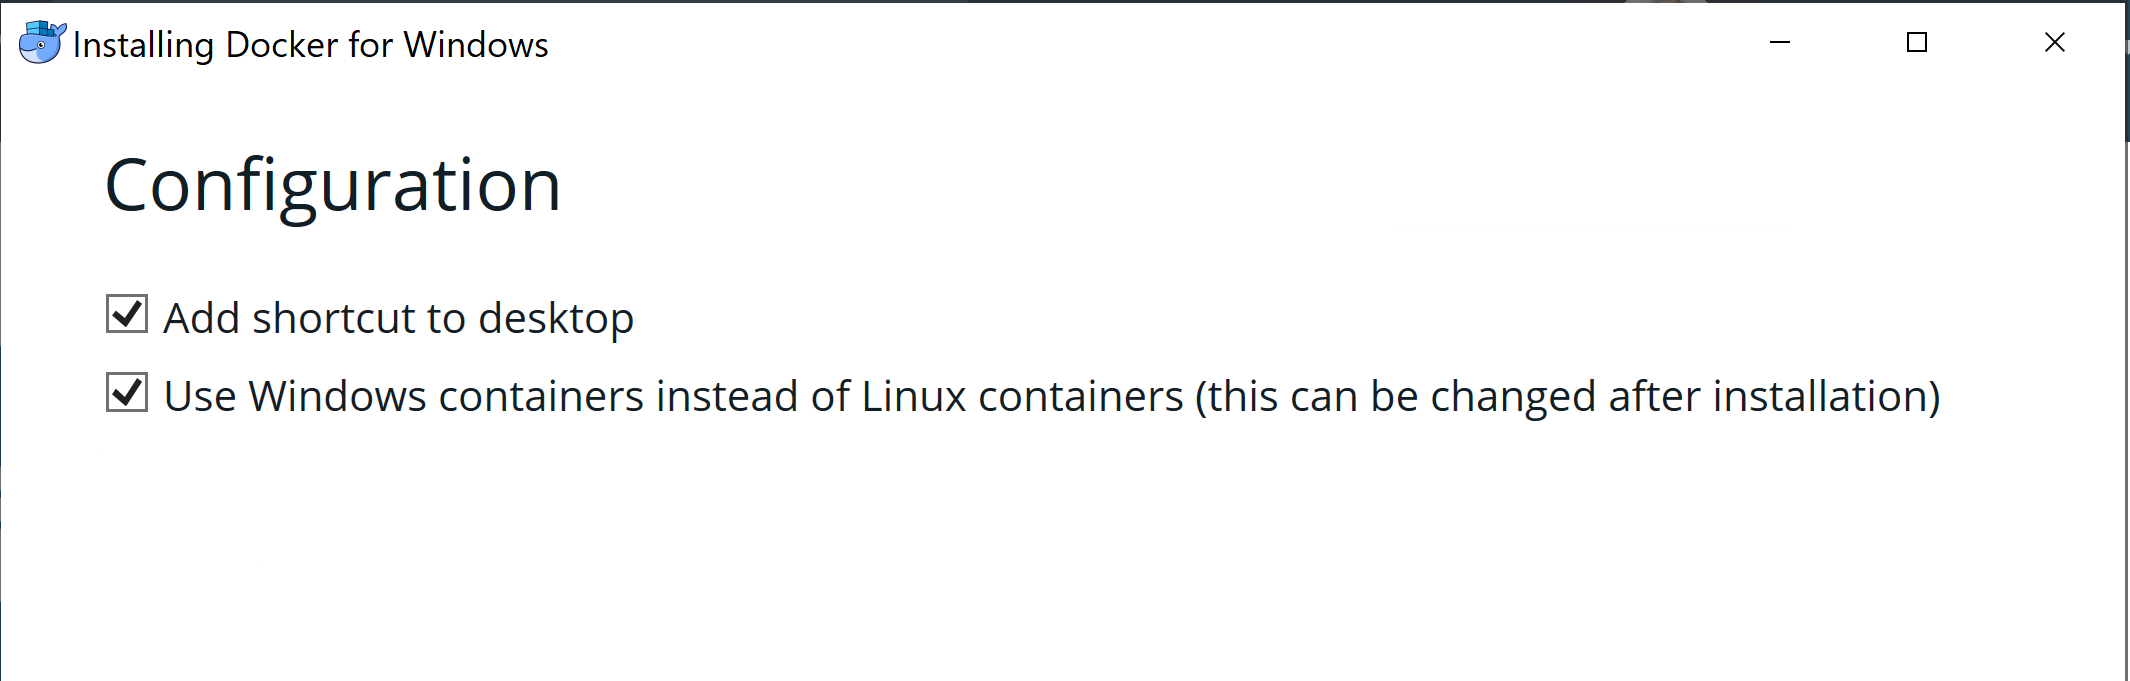
As we want a full Windows environment for PowerShell (not PowerShell Core on Linux) select “Use Windows containers” when installing Docker.
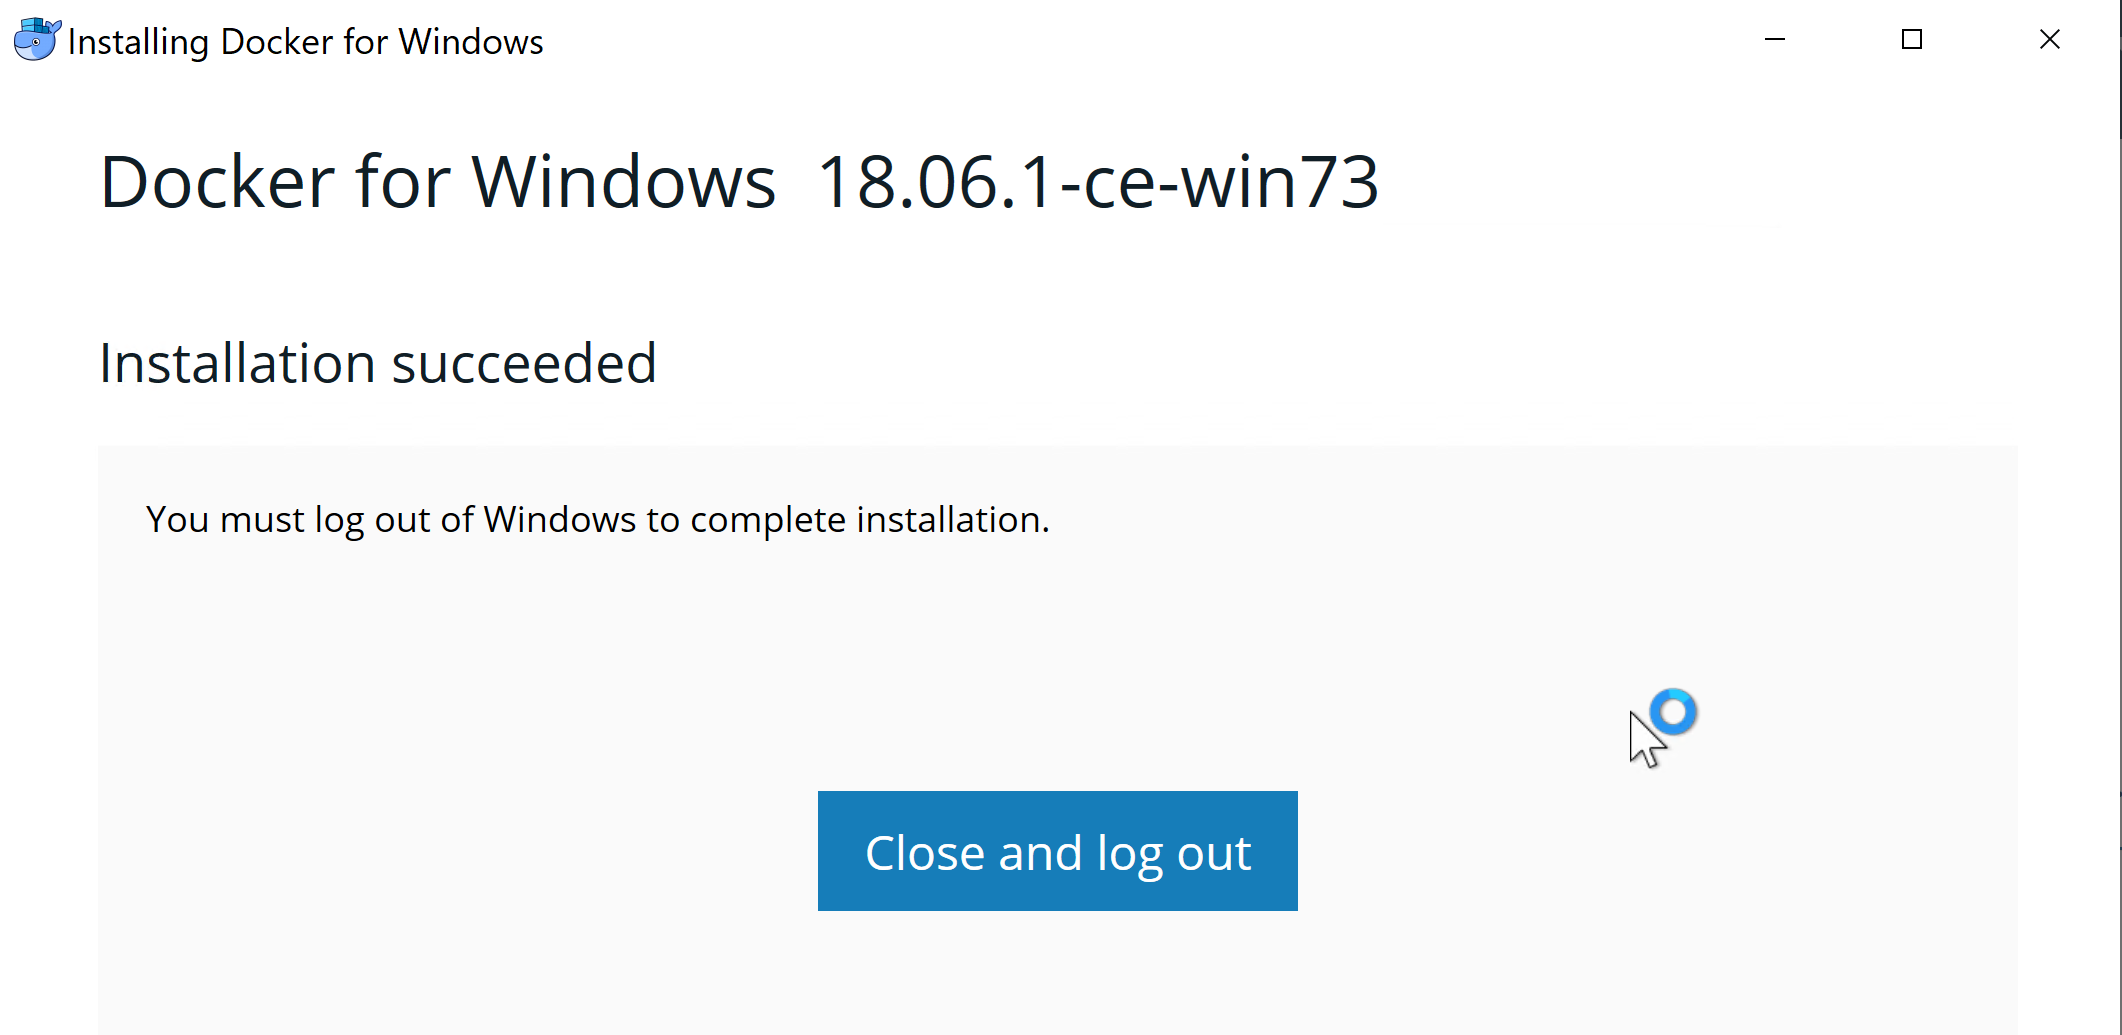
At the end of the Docker install there is a reboot required.
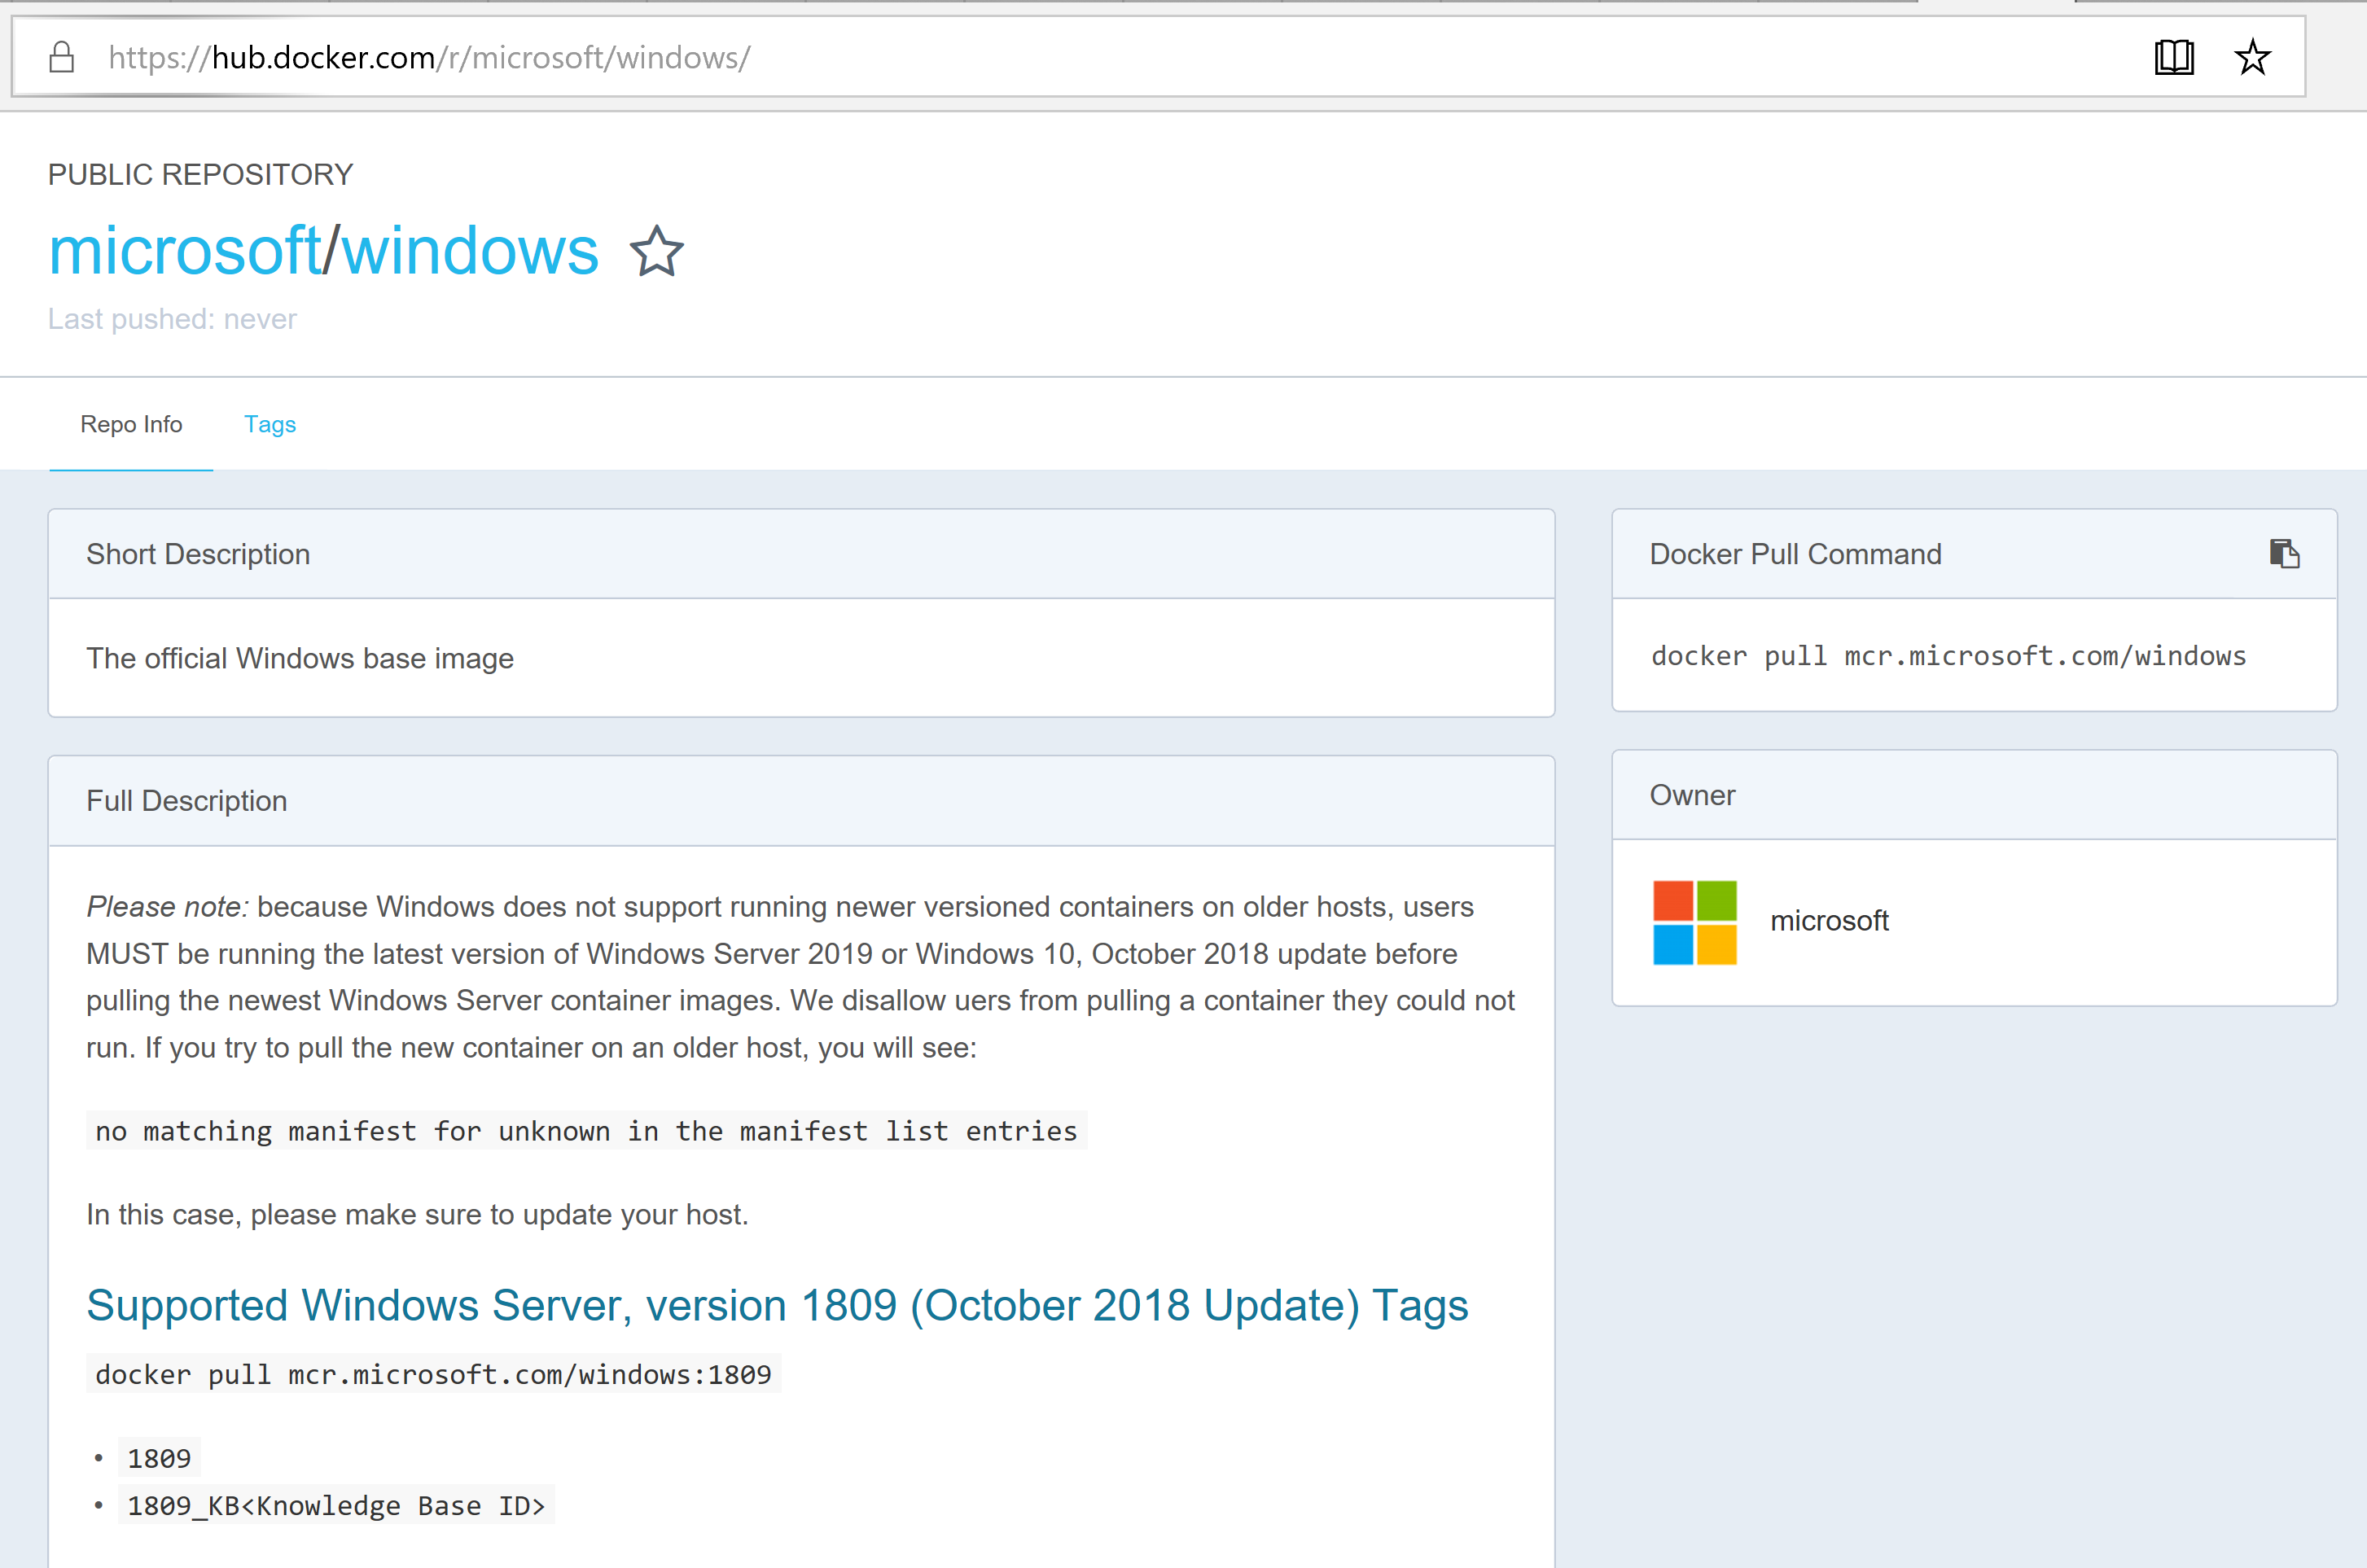
Get the Windows 1809 Base Container Image
We’re almost there. We need to get the recently released full Windows Image that will be the basis for our containers that will allow us to run full PowerShell environments. Don’t be confused by the Nano and Core images that have been available for quite some time. This is the FULL WINDOWS Build 1809 IMAGE.
As future Windows updates increment the version, the version you want to pull needs to be no greater than the host it is running on. Unlike the Insider Images the release versions follow the Release Number not the Build Number. Looking at the repository we can see that the image name is 1809 where-as its Build Number is 10.0.17763.134.
With the workstation restarted we SSH into it and pull the Windows 1809 Docker Image. I’ve given my Windows 10 VM a DNS name so I don’t need to figure out the IP Address each time I start it up. From a Windows command prompt to access your new VM (via IPAddress) use;
ssh username@IPAddressofWin10VM
Once we have a console on our Windows 10 VM we can pull the Windows 10 Docker Image.
docker pull mcr.microsoft.com/windows:1809
The image will be retrieved.
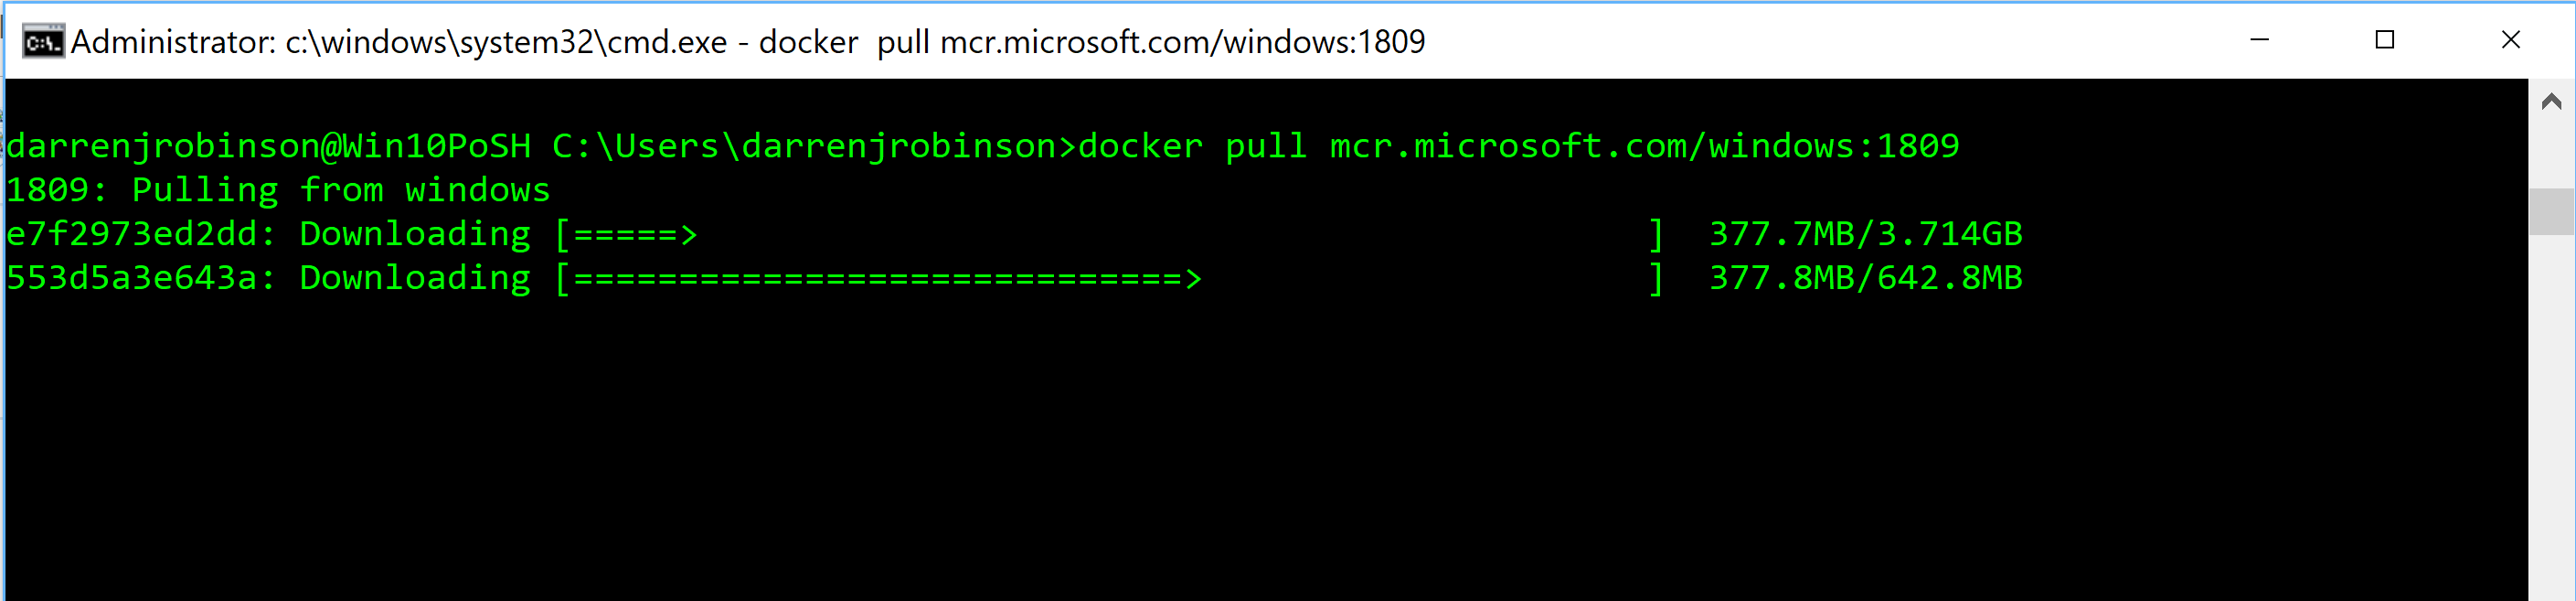
After pulling the image it will be extracted. Depending on the spec of your VM this may take 10-20 minutes.

After Extraction we have our base Container Image.

In order to create a container from the command console via SSH we need to be elevated. I’ll cover that in the next post. So to validate we are able to create a container based on the full Windows 10 1809 image, RDP into the Windows 10 VM and open an elevated command prompt. Then type the command;
docker run -it mcr.microsoft.com/windows:1809 powershell $psversiontable
which will start a container using the Windows 10 1809 Image and run PowerShell with the command $PSVersionTable that will return the version of PowerShell.
Summary
As you can see from the screenshot above, we have Nested Virtualization in an Azure Resource Manager Windows 10 Virtual Machine running a Docker Windows 10 1089 Container Image that allows us to run PowerShell Desktop 5.1. BOOM!!
That’s it for the first post, where I introduced the concept of Full Windows Docker Images supporting PowerShell Desktop in Azure. Stay tuned for the next post that starts putting this new functionality to good use.