Overview
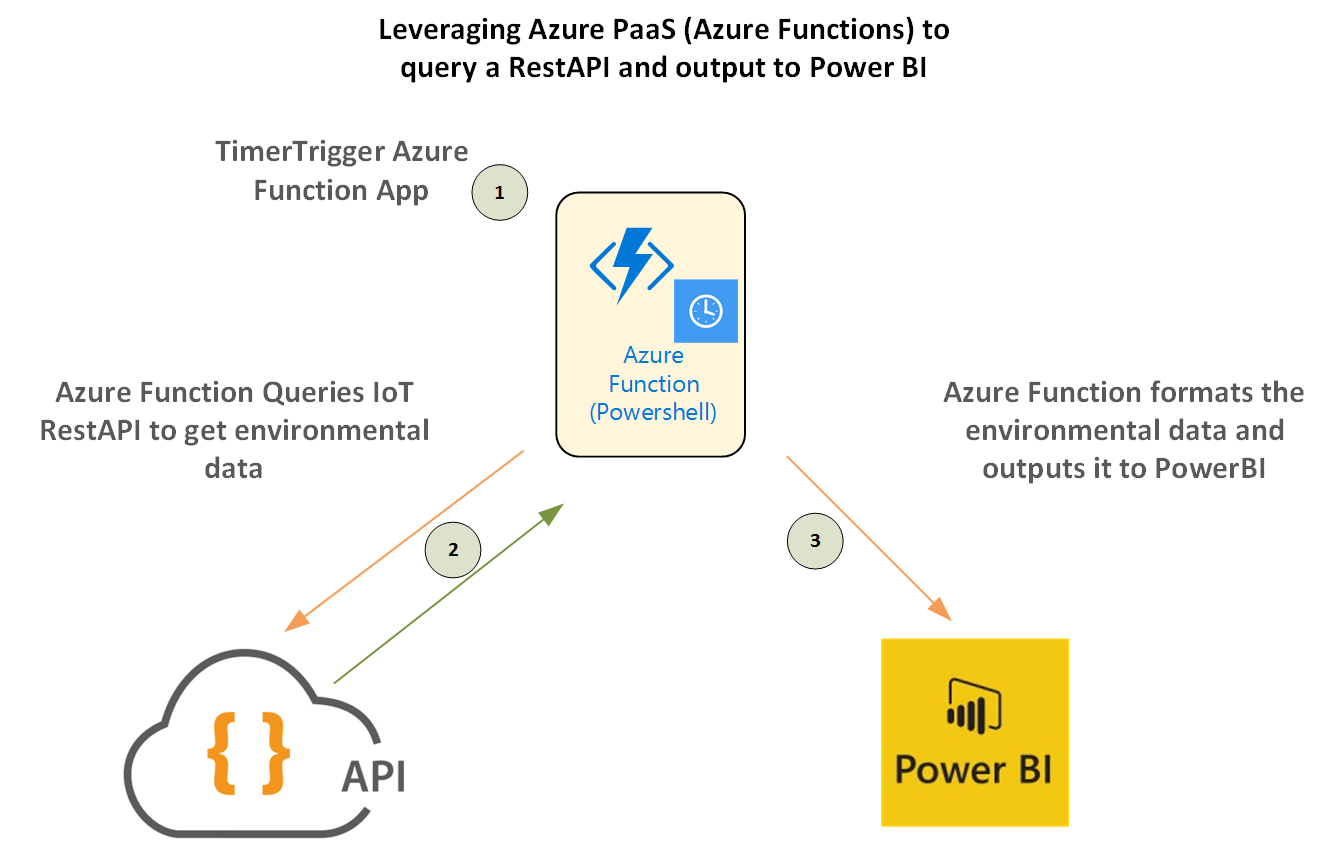
This blog post details using a Powershell Azure Function App to get IoT data from a RestAPI and update a table in Power BI with that data for visualization.
The data can come from anywhere, however in the case of this post I’m getting the data from WioLink IoT Sensors. This builds upon my previous post here that details using Powershell to get environmental information and put it in Power BI. Essentially the major change is to use a TimerTrigger Azure Function to perform the work and leverage the “serverless” Azure Functions model. No need for a reporting server or messing around with Windows scheduled tasks.

Prerequisites
The following are the prerequisites for this solution;
- The Power BI Powershell Module
- available from here
- Register an application for RestAPI Access to Power BI
- follow this guide here
- A Power BI Dataset ready for the data to go into
- my blog post here details creating the dataset that I’m reusing in this post
- AzureADPreview Powershell Module
- available from here
Create a folder on your local machine for the Powershell Modules then save the modules to your local machine using the powershell command ‘Save-Module” as per below.
Save-Module -Name PowerBIPS -Path C:\temp\PowerBI
Save-Module -Name AzureADPreview -Path c:\temp\AzureAD
Create a Function App Plan
If you don’t already have a Function App Plan create one by searching for Function App in the Azure Management Portal. Give it a Name, Select Consumption Plan for the Hosting Plan so you only pay for what you use, and select an appropriate location and Storage Account.

Register a Power BI Application
Register a Power BI App if you haven’t already using the link and instructions in the prerequisites. Take a note of the ClientID. You’ll need this in the next step.
Configure Azure Function App Application Settings
In this example I’m using Azure Functions Application Settings for the Azure AD AccountName, Password and the Power BI ClientID. In your Azure Function App select “Configure app settings”. Create new App Settings for your UserID and Password for Azure (to access Power BI) and our PowerBI Application Client ID. Select Save.
Not shown here I’ve also placed the URL’s for the RestAPI’s that I’m calling to get the IoT environment data as Application Settings variables.

Create a Timer Trigger Azure Function App
Create a new TimerTrigger Azure Powershell Function App. The default of a 5 min schedule should be perfect. Give it a name and select Create.

Upload the Powershell Modules to the Azure Function App
Now that we have created the base of our Function App we’re going to need to upload the Powershell Modules we’ll be using that are detailed in the prerequisites. In order to upload them to your Azure Function App, go to App Service Settings => Deployment Credentials and set a Username and Password as shown below. Select Save.

Take note of your Deployment Username and FTP Hostname.

Create a sub-directory under your Function App named bin and upload the Power BI Powershell Module using a FTP Client. I’m using WinSCP.

To make sure you get the correct path to the powershell module from Application Settings start Kudu.
Traverse the folder structure to get the path to the Power BI Powershell Module and note the path and the name of the psm1 file.

Now upload the Azure AD Preview Powershell Module in the same way as you did the Power BI Powershell Module.

Again using Kudu validate the path to the Azure AD Preview Powershell Module. The file you are looking for is the “Microsoft.IdentityModel.Clients.ActiveDirectory.dll” file. My file after uploading is located in “D:\home\site\wwwroot\MyAzureFunction\bin\AzureADPreview\2.0.0.33\Microsoft.IdentityModel.Clients.ActiveDirectory.dll”

This library is used by the Power BI Powershell Module.
Validating our Function App Environment
Update the code to replace the sample from the creation of the Trigger Azure Function as shown below to import the Power BI Powershell Module. Include the get-help line for the module so we can see in the logs that the modules were imported and we can see the cmdlets they contain. Select Save and Run.

Below is my output. I can see the output from the Power BI Module get-help command. I can see that the module was successfully loaded.

Function Application Script
Below is my sample script. It has no error handling etc so isn’t production ready, but gives a working example of getting data in from an API (in this case IoT sensors) and puts the data directly into Power BI.
Viewing the data in Power BI
In Power BI it is then quick and easy to select our Inside and Outside temperature readings referenced against time. This timescale is overnight so both sensors are reading quite close to each other.

Summary
This shows how easy it is to utilise Powershell and Azure Function Apps to get data and transform it for use in other ways. In this example a visualization of IoT data into Power BI. The input could easily be business data from an API and the output a real time reporting dashboard.
Follow Darren on Twitter @darrenjrobinson


