Which Azure AD Tenants is my user account federated too? More specifically, in which Azure Active Directory Tenants do I have an Azure Active Directory B2B Guest Account? Is there a way I can quickly get an Azure AD User Account Federation Report? Of course the easiest option is to go to My Apps and select the Organizations switcher.

However, what if you’re like me and have numerous accounts across Azure Active Directory Tenants and even MicroSoft Accounts (MSA)? You would need to login to each one and select Organizations. Also you only see the primary tenant name. What about Azure AD Tenants with numerous custom domain names configured?
I’ve come up with two alternatives.
- You can register an Azure AD Application with the discreet permissions required to query Azure Service Management
- Leverage an existing well-known client ID for Microsoft Azure PowerShell that already has the scope to query Azure Service Management
This post covers both methods. Keep in mind that the API call to Azure Service Management is only available with Delegated Permissions. This means that if you go the path of registering your own Azure AD Application, on first use users will need to consent to the permissions required.
Leveraging a well-known client ID
I’m diving into this one first as it is the easiest method that will likely be more widely used. That is because it doesn’t require registering an Azure AD Application with the associated permissions to query Azure Service Management.
I’m also providing two methods of utilizing this method. One as a PowerShell Module that simplifies full automation of being able to generate an Azure AD User Account Federation Report, and the other as a small script.
Dependencies
The following script and module, whilst leveraging the Azure PowerShell well-known client ID will also use two other PowerShell Modules to streamline the query. The AzureADUserFederation PowerShell Module will attempt to install these modules if they aren’t present.
- MSAL.PS to simplify authentication to Microsoft Graph
- Install the module from the PS Gallery using PowerShell 5.1+ using command
- Install-Module MSAL.PS -Force -AcceptLicense
- Install the module from the PS Gallery using PowerShell 5.1+ using command
- AzureADTenantID to query and validate that the domain name of the users’ email/UPN being queried belongs to an Azure Active Directory Tenant
- Install the module from the PS Gallery using PowerShell 5.1+ using command
- Install-Module -name AzureADTenantID
- Install the module from the PS Gallery using PowerShell 5.1+ using command
AzureADUserFederation PowerShell Module
The PowerShell Module has some additional logic over the script below. It attempts to utilise the MSAL Cache whilst also accepting input from the pipeline. It also provides additional functions such as the ability to force authentication and bypass the MSAL token cache.
The AzureADUserFederation Module can be installed from the PowerShell Gallery on Windows PowerShell 5.1x and above using the following command.
Install-Module -name AzureADUserFederation
How to use
Import-Module AzureADUserFederation
Get-AzureADUserGuestTenants -userUPN 'user@aaddomain.com'
or using the pipeline
Import-Module AzureADUserFederation
'user@aaddomain.com' | Get-AzureADUserGuestTenants
The module will attempt to use a previous cached token for access before falling back to prompting login in a browser directed directly at the Azure AD Tenant associated with the users’ UPN/email address. If you want to force reauthentication use the -forceAuth $true option.
Import-Module AzureADUserFederation
Get-AzureADUserGuestTenants -userUPN 'user@aaddomain.com' -forceAuth $true
The output will be provided in the PowerShell console.

The Script Version
The following script requests input from the PowerShell console for the UPN/email of the AAD Member User Account to be queried. It then validates that the domain name is registered with an Azure AD Tenant. It then prompts the user to authenticate in a browser window against the Azure AD Tenant where the AAD User Account resides. Finally, it then outputs the AAD Tenants the user account is federated to as an AAD B2B Guest Account. The output is a PS Object just as the PowerShell Module shown above.
Register an Azure AD Application
As mentioned in the introduction to this post, the alternative to using a well-known client ID is to register your own Azure AD Application and provide it the permissions required to query Azure Service Management. If you want to use this functionality across multiple Azure AD Tenants you can either create an application registration in every Azure AD Tenant or if you have partner organisations you wish to use it across, configure the application registration under Supported Account Types for
Accounts in any organizational directory (Any Azure AD directory - Multitenant)
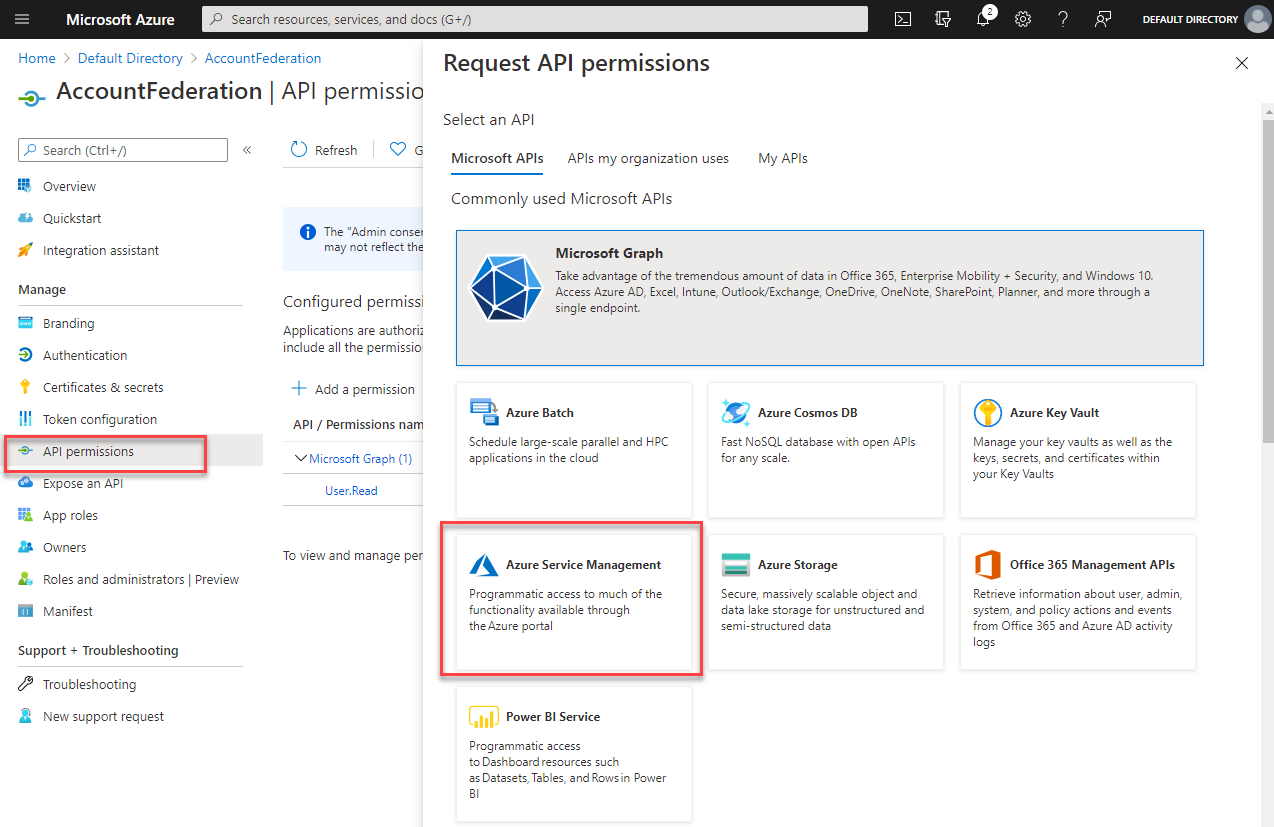
In the Azure Portal register a new Azure AD Application. I named mine AccountFederation. On the API permissions tab navigate to Azure Service Management.

Under Delegated permissions select user_impersonation and select Save.

Select the Authentication blade and under Web => Redirect URI’s enter http://localhost Under Advanced Settings enable Allow public client flows. Select Save.

You can utilise the script that is above. The only change required is to swap out the Client ID from the well-known Azure PowerShell client ID for that Azure AD Application your registered above. The Application (client) ID can be found on the Overview Blade. Make the change in Line 5 of the script above.
As mentioned in the introduction, the API query to Azure Service Management is only possible using Delegated Permissions. This means that running the script the first time for each Azure AD User will prompt for consent.
Authentication with consent prompts for delegated permissions


Following authentication and giving authorization consent to the registered application the output will be shown just as per the other methods.

Summary
In this post I’ve shown three methods to obtain an Azure AD User Account Federation Report. The first method is the most streamlined, by not requiring authorization consent for the delegated permissions. The second provides the same output but does require the additional steps of registering an Azure AD Application and user consent on first use.


